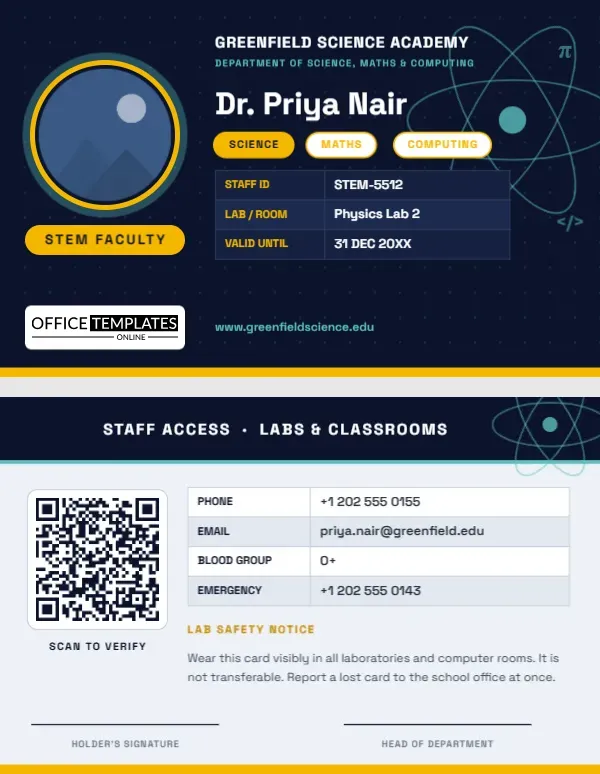
Science, mathematics and computing teachers work in rooms that other teachers do not: chemistry labs, physics workshops, robotics corners and computer suites. Those rooms often need to be locked, and they often have equipment that must be signed out. A card that says “STEM faculty” in plain sight helps the whole school know who belongs in them. This science, math and computer teacher ID card template pairs practical fields with a design that feels like the subjects: a midnight navy background, a glowing atom, a faint grid of dots and the odd formula symbol.
A design that speaks the language of STEM
The front is a landscape card, 3.375 x 2.125 inches. On the right side an atom made of three tilted orbits floats behind the text, with a small nucleus in teal. Around it sit a pi symbol, a summation sign and a code bracket, a wink at mathematics and computing. The colours are navy, teal and amber, chosen for contrast and a modern, technical feel. The typeface is Space Grotesk, a geometric sans-serif with a slightly futuristic character that stays legible at small sizes.
Three subjects, one card
Below the teacher’s name you will find three rounded chips: Science, Maths and Computing. The active subject is filled in amber, and the others are outlined. Switch the highlight by selecting a chip and changing its fill and text colour. If a teacher covers two subjects, fill two chips. If your school uses other STEM labels, such as Engineering, Robotics or Design Technology, just retype the words.
What the front contains
- A large round photo with a double ring in teal and amber
- A “STEM Faculty” pill under the photo
- School and department lines across the top
- The teacher’s name in large type, with a title such as Dr., Mr. or Ms.
- A three-row table for staff ID, lab or room, and valid-until date
- A website line and a small template logo credit
Back of the card
The back switches to a light background so it prints economically and stays easy to read. A navy header says “Staff Access · Labs and Classrooms” and carries a partial atom in the corner. On the left is a QR code with a “Scan to verify” label; on the right, a table lists phone, email, blood group and emergency contact. A short lab safety notice reminds staff to wear the card visibly in laboratories and computer rooms. Two signature lines, one for the holder and one for the head of department, sit at the bottom.
Why a lab safety line belongs on the card
A card worn in a lab has a second job. It shows who is supervising, and if an incident happens it helps others find the right person quickly. Adding the lab or room number to the front table and an emergency contact on the back means first responders have what they need. If your school has specific safety rules, replace the notice text with your own.
Step-by-step customization
- Click the circular photo and use Replace Image to add a headshot.
- Type the school and department names across the header.
- Change the teacher’s name and set the subject chips.
- Edit the table: replace the staff ID, add the lab or room and set the expiry date.
- Click the QR code and paste the address of the staff or lab-booking page.
- Download the card as a PDF, PNG or JPG.
Ideas for the lab or room line
- Physics Lab 2
- Chemistry Prep Room
- Computer Suite B
- Robotics Workshop
- Math Resource Centre
- Biology Greenhouse
Beyond the classroom
STEM teachers often supervise clubs, competitions and outreach events. The same card can double as a pass for a science fair, a coding competition or a school trip to a research centre. Because the QR code can point to any web page, you can link it to a club sign-up sheet or an event schedule, and change the target later by editing the code.
Printing tips for dark designs
The front is dark, so use a good quality printer and a paper or PVC with a matte finish to avoid fingerprints and glare. Print at 300 dpi and check the navy against your screen on a test print, because dark tones sometimes look lighter on paper. If you are printing many cards, run one first and check that the small amber text is readable. The back uses a light background and prints easily on any office printer.
Answers to common questions
Can I use it for a teacher of a single subject?
Yes. Fill only one chip, or delete the chips and use the space for a different line.
Is the atom picture editable?
Yes. It is made of shapes, so you can recolour it, resize it or delete it.
What if my school uses different colours?
Change the navy background and the accents from the toolbar. The design keeps its structure whatever the palette.
Building a matching set for the whole department
If several teachers in your science, maths and computing department need cards, keep the design identical and change only the essentials. Duplicate the template, replace the photo, name, staff ID and highlighted chip, and save each version under a clear name such as “Nair Physics” or “Okafor Computing”. Doing this keeps the cards consistent and speeds up printing, because you can send a single PDF batch to the printer. Lab technicians and teaching assistants can use the same card with the pill changed to “Lab Technician” or “Teaching Assistant”.
Getting a good picture for the round frame
The photo sits in a circle with a double ring, so a tight head-and-shoulders portrait works best. Ask teachers to face the camera in even light and avoid strong shadows or glasses that reflect a window. A dark or neutral background suits the navy card and keeps attention on the face. If a teacher is photographed in a lab coat, crop close so the collar shows and the rest of the clothing does not distract.
Give your science, maths and computing teachers a card that looks like it belongs in the lab. Open the template, add the details and download a STEM-themed ID.