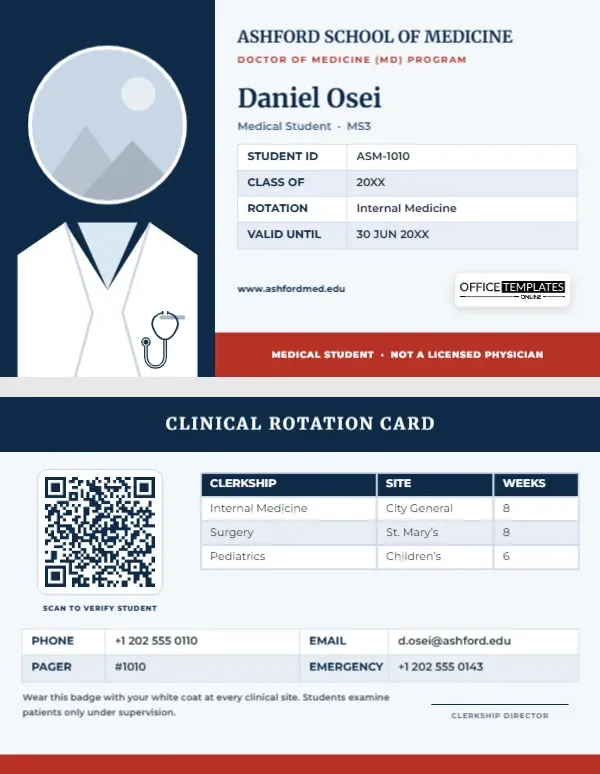
The white coat is the most famous symbol of medicine, and for medical students it arrives early, often at a white coat ceremony in the first weeks of school. From then on, the coat and an ID badge go everywhere together: wards, clinics, operating theatres and simulation labs. This Medical Student ID Card brings the two together. The student’s portrait sits above a white coat drawn on a deep navy panel, and a clear red band states what every patient should know: medical student, not a licensed physician.
A Portrait Wearing the White Coat
The card is landscape, 3.375 inches wide and 2.125 inches high. The left third is a navy panel. At its top, the student’s photo sits in a circle with a white border, and directly beneath it, a white coat is drawn with its lapels opening into a V over a pale blue shirt, so the portrait appears to be wearing the coat. A navy stethoscope lies on the coat’s pocket.
On the right, ASHFORD SCHOOL OF MEDICINE is set in Merriweather, a traditional serif, with Doctor of Medicine (MD) Program in red capitals. The student’s name, Daniel Osei on the sample, is set large in navy, with Medical Student · MS3 below. A four-row table lists the student ID, graduating class, current rotation (Internal Medicine), and validity date. The school website and our logo sit above a red band along the bottom edge that reads MEDICAL STUDENT · NOT A LICENSED PHYSICIAN.
Why the Notice Band Matters
Patients sometimes assume that anyone in a white coat is a doctor. Medical education guidelines and hospital policies generally ask students to introduce themselves clearly as students and to wear identification that says so. The red band on this card makes the student’s status visible even before they speak, which protects patients’ right to informed choices and protects students from being asked to do things beyond their role. It is also a helpful reminder for nurses and other staff on busy units.
The Clinical Rotation Card
The back has a navy header reading CLINICAL ROTATION CARD. Below it:
- A QR code labelled Scan to verify student, which can link to the school’s student verification page or the student’s clinical schedule.
- A clerkship table with rotation, site, and length: Internal Medicine at City General for 8 weeks, Surgery at St. Mary’s for 8 weeks, and Pediatrics at the Children’s Hospital for 6 weeks.
- A contact grid with phone, email, pager, and emergency number.
- A note: wear this badge with your white coat at every clinical site; students examine patients only under supervision.
- A signature line for the clerkship director and a red band along the bottom.
Typical Core Clerkships
| Clerkship | Common length | Setting |
|---|---|---|
| Internal Medicine | 8–12 weeks | Inpatient wards and clinics |
| Surgery | 8 weeks | Operating theatre, wards, clinics |
| Pediatrics | 6–8 weeks | Children’s hospital and clinics |
| Obstetrics and Gynecology | 6 weeks | Labour ward, clinics |
| Psychiatry | 4–6 weeks | Inpatient and outpatient units |
| Family Medicine | 4–6 weeks | Community practices |
Schools structure clinical years differently; some use longitudinal integrated clerkships instead of block rotations. Change the table to match your curriculum.
Setting Up the Ashford Card
- Photo: choose the round portrait above the coat, then Replace Image. Use a professional headshot; the circle crops it neatly above the lapels.
- School and program: retype the school name and program line (MD, DO, MBBS, or PA program).
- Year: change MS3 to MS1, MS2, or MS4, or to the local equivalent.
- Tables: both the front details and the clerkship list are editable through Edit Data; + Row adds an elective.
- QR code: link it in the Barcodes & QR panel to a verification or schedule page.
- Coat and stethoscope: the coat is a single group and the stethoscope an editable vector; both can be recoloured, although white works best for the coat.
Etiquette for Students on the Wards
Good habits start with the badge. Introduce yourself to every patient with your name and role, ask permission before examining them, and accept a refusal gracefully. Wear the badge on your coat at chest height where it can be read. Follow each hospital’s infection control rules for lanyards and coats, and never lend your badge or access card to anyone. If you are unsure whether you are allowed to perform a task, ask your resident or attending: the red band on your card is a reminder that supervision is part of the learning.
For Medical Schools and Related Programmes
MD and DO programs, international medical schools with MBBS courses, physician assistant programs, dental and veterinary schools, and pre-clinical students attending hospital shadowing days can all use this design. Change the notice band wording for each: PA STUDENT, DENTAL STUDENT, or OBSERVER · NOT A CLINICIAN.
Printing a Clinical-Grade Badge
PVC is the best choice for a badge that will be wiped down and worn for years. The navy and white design prints crisply; check that the thin grey lapel lines on the coat remain visible. Many schools add a hospital access chip or magnetic stripe through their card supplier. Print the back for each academic year with the new rotations.
Carrying the Card Beyond the Hospital
Medical students often work at several sites in a single year: teaching hospitals, community clinics, rural placements and outreach events. The rotation table on the back makes it easy to show each site’s security or front desk why you are there, and the QR code lets a supervisor confirm your enrolment in seconds. At conferences and interviews, the same card is a tidy way to identify yourself as a medical student from your school. Keep it with your white coat, so it is never forgotten on a busy morning.
Medical Student Questions
Can I remove the notice band?
You can, but most schools and hospitals expect student status to be obvious. We recommend keeping it.
Can I use the card for a shadowing programme?
Yes. Change MEDICAL STUDENT to OBSERVER and the rotation table to the departments you will visit.
Does the design fit a vertical badge holder?
It is laid out horizontally. Use a horizontal holder, or print it on a vertical card and rotate the design.
Open the template, place the student’s photo above the white coat, fill in the clerkships, and step onto the wards clearly identified as a doctor in training.