A syllabus is a long list, and it is easy to lose your place in it. Which chapters has the teacher covered? Which ones do you actually have notes for? Which have you revised, and which did you only skim? A syllabus tracker answers all four questions for every subject on a single page, so revision starts from facts instead of guesses.
Divider Tabs That Line Up With Your Subjects
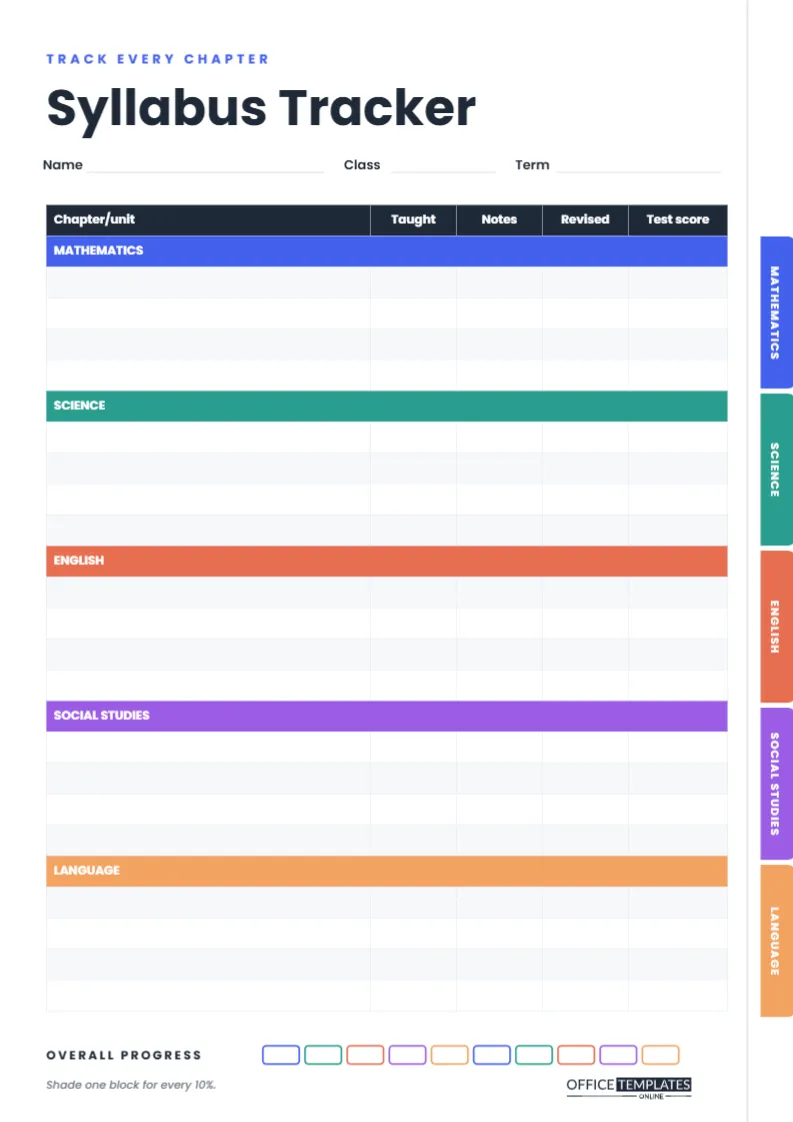
This A4 portrait page (210 x 297 mm) is designed like the first sheet in a well-organised ring binder. Coloured divider tabs stick out from the right edge of the page, each carrying a subject name printed vertically: Mathematics in blue, Science in teal, English in coral, Social Studies in purple and Language in orange. A thin line marks the page edge between the paper and the tabs.
The clever part is that each tab lines up exactly with its subject’s section in the table, so your eye travels straight from a tab to the chapters it covers. The title Syllabus Tracker sits at the top in bold Poppins under a blue Track every chapter label, with lines for Name, Class, and Term.
Inside the Tracker Table
A dark header row names five columns: Chapter/unit, Taught, Notes, Revised, and Test score. Below it, each subject has a full-width coloured band in its tab colour, followed by four rows for chapters. The structure repeats five times, for twenty chapters in total.
- Taught: tick when the teacher has covered the chapter in class.
- Notes: tick when your own notes for it are complete.
- Revised: tick after you have reviewed it properly, ideally by testing yourself.
- Test score: the mark from a chapter test or practice paper.
At the bottom, an Overall Progress bar of ten outlined blocks, each edged in a subject colour, invites you to shade one block for every 10% of the syllabus completed.
Breaking a Syllabus Into Trackable Chunks
- Find the official list. Use the syllabus or scheme of work from your teacher, school website, or exam board.
- Choose the right size of chunk. A row should be something you could revise in one or two sittings. A huge unit like Algebra may need splitting into Linear equations and Quadratics.
- Keep the teacher’s order. Entering chapters in the order they are taught makes the Taught column fill neatly from the top.
- Add rows where needed. Most subjects have more than four chapters per term; add rows in the editor so every chapter has its own line.
- Leave the ticks for later. Fill in chapter names now; ticks and scores come as the term goes on.
Calculating Your Overall Progress
The progress bar works best with a simple rule. Count the total number of chapter rows you have listed, then count how many have a tick in the Revised column. Divide the second number by the first and multiply by 100. For example, with 30 chapters listed and 12 revised, you are at 40%, so four blocks are shaded. Updating the bar once a week gives a satisfying, honest picture of how far you have come, and how much is left before exams.
Reading the Gaps
The empty cells are the most useful part of the page. A chapter that is Taught but has no Notes tick means you need to catch up on notes while the lesson is still fresh. A chapter with Notes but no Revised tick is next on the revision list. A low Test score next to a Revised tick means the method needs to change, perhaps from re-reading to practice questions. Scanning across a subject’s four rows in this way tells you exactly what to do with your next study session.
Turning the Tracker Into a Revision Timetable
When exams are six to eight weeks away, the tracker becomes the source for your revision timetable. Count the chapters without a Revised tick in each subject, then divide them across the weeks you have left, starting with the subjects whose exams come first. Chapters with low Test scores get a double slot. Write the plan in pencil beside each row, for example wk 2 or wk 5, so the page shows both what is left and when you will do it. As each chapter is revised, tick it, shade another block in the progress bar if you have passed the next 10%, and enjoy watching the gaps close.
Teachers can use the same approach in class, asking students to highlight their three weakest chapters in each subject and bring the tracker to revision lessons.
Adapting the Tabs and Table
- Double-click the table to open Edit Table Data. Retype subject bands (for example, Physics, Chemistry, Biology) and add or remove chapter rows.
- Click each tab’s text to rename it, and click the tab shape to change its colour. Keep the tab colour and its table band the same so they still match.
- If you add rows to a subject, move that subject’s tab down so it stays aligned with its section.
- Rename columns to match your course, such as Homework done instead of Notes or Practice paper instead of Test score.
Printing and Using It All Year
Print on A4 at Actual size. The coloured bands and tabs are narrow, so ink use is modest. Keep the tracker at the very front of your main binder, where the tabs make it easy to find, and update it every Friday. If you study several groups of subjects, make one page per group with Add Page, each with its own set of tab colours.
Syllabus Tracker FAQs
Who is this tracker for?
Secondary students preparing for end-of-year, board or national exams get the most from it, but it also suits college courses with many units.
Can teachers use it with a class?
Yes. A teacher can fill in the chapter names for the whole class, download it, and hand out copies, so every student tracks the same syllabus.
What if I have more than five subjects?
Use a second page for the remaining subjects, or replace a band with another subject and change its tab to match.
Know Exactly Where You Stand
List your chapters today and tick what has already been taught. From then on, a quick weekly update keeps the whole syllabus under control, one tab at a time.