A daily lesson plan tells you what happens tomorrow. A unit plan tells you why: where the learning is heading over three or four weeks, what students should understand at the end, how you will know, and how each week builds towards it. Teachers who plan whole units first find their daily planning faster and more focused, because every lesson already has a place on the map. This template makes that map literal.
A Roadmap Across the Top
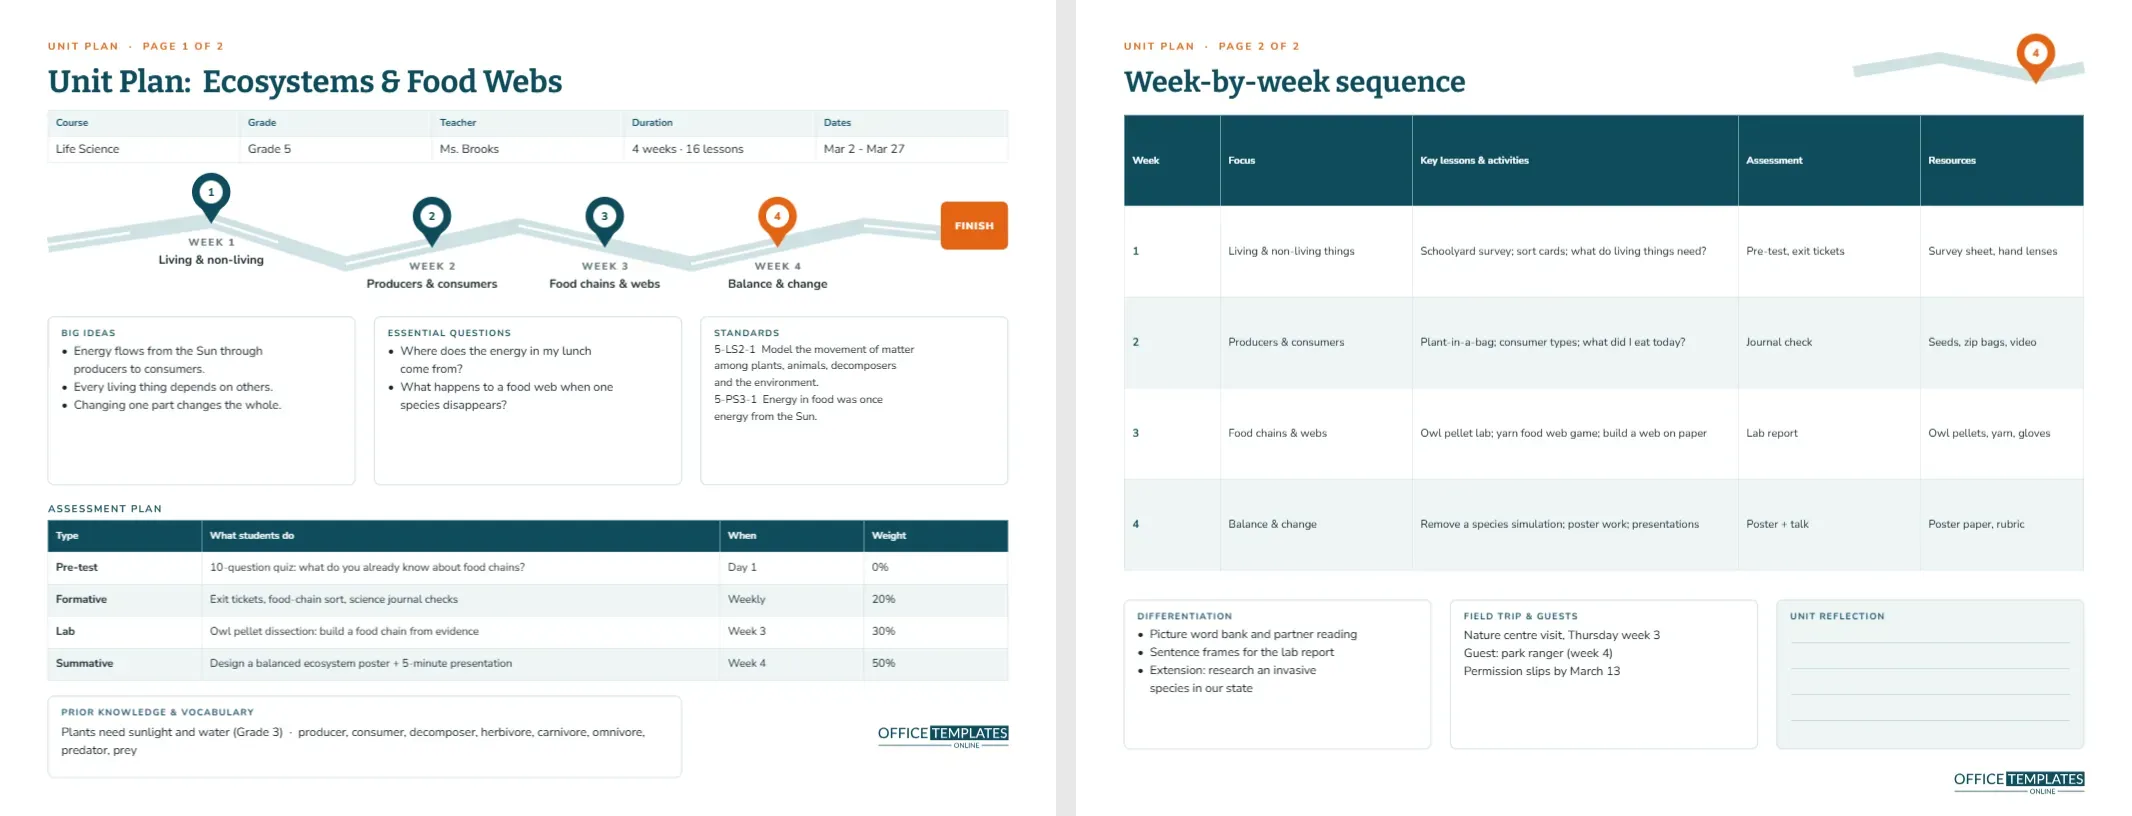
Page one opens with a winding road drawn across the full width of the landscape page, a pale teal ribbon with a white dashed centre line. Four map pins stand along it, labelled Week 1 to Week 4 with each week’s focus: living and non-living things, producers and consumers, food chains and webs, and balance and change. The last pin is orange, and an orange FINISH flag waits at the end of the road. The roadmap turns the unit into a journey students and colleagues can follow at a glance.
Unit Details
Above the road, the title reads Unit Plan: Ecosystems & Food Webs in Bitter, a sturdy slab serif, and a strip records course, grade, teacher, duration, and dates. The sample is a four-week, 16-lesson Grade 5 life science unit running from March 2 to March 27.
Big Ideas, Questions and Standards
Three equal boxes sit under the roadmap. Big Ideas lists the enduring understandings, such as energy flows from the Sun through producers to consumers. Essential questions list the questions that drive the unit: Where does the energy in my lunch come from? Standards lists the curriculum codes with short descriptions (5-LS2-1 and 5-PS3-1 in the sample).
Assessment Plan
A real editor table plans every assessment in the unit, from the pre-test to the summative task, with weightings:
| Type | What students do | When | Weight |
|---|---|---|---|
| Pre-test | 10-question quiz on food chains | Day 1 | 0% |
| Formative | Exit tickets, food-chain sort, journal checks | Weekly | 20% |
| Lab | Owl pellet dissection, build a chain from evidence | Week 3 | 30% |
| Summative | Balanced ecosystem poster and presentation | Week 4 | 50% |
A final box lists prior knowledge and the unit vocabulary.
Page Two: Week by Week
The second page carries a short stretch of the same road with the final orange pin, linking the two pages. Its main table breaks the unit into weeks, with columns for focus, key lessons and activities, assessment and resources. Rows are tall enough for two lines of detail, so a colleague could teach the unit from this page. Three boxes underneath cover differentiation, field trips and guest speakers, and a lined unit reflection.
Planning a Unit With Backward Design
- Write the big ideas and essential questions first.
- Design the summative assessment: what will prove students understand?
- Decide on formative checks along the way.
- Sequence the weeks so each one builds a piece of the final task.
- Only then plan individual lessons, using a daily template.
This approach, popularised as Understanding by Design, keeps a unit focused on understanding rather than on covering pages of a textbook.
Adjusting the Number of Weeks
For a three-week unit, delete one pin and its labels and spread the others along the road; for a six-week unit, add pins by duplicating one and moving it. In the week-by-week table, use Add Row or remove a row to match. The roadmap is a group, so it moves as one piece if you need to resize it.
Using It for Any Subject
Swap the content and the same structure plans a novel study in English (weeks for each section of the book), a history unit (chronological stops on the road), a maths unit (skills building to a project) or a modern-languages topic (vocabulary, grammar, speaking and a final role-play).
Sharing With Your Department
Unit plans are documents teams build together. Save the file, share the PDF in your department drive, and let each teacher add their own daily plans underneath. When a new colleague joins, the unit plan explains the thinking behind every lesson in the unit.
Landscape for Wide Tables
The page is US Letter in landscape, 11 x 8.5 inches, because unit plans need wide tables. Print with landscape orientation selected; two-sided printing keeps both pages on one sheet, which is convenient for binders and planning meetings.
Recolouring the Road and Pins
The pins are simple shapes, and the road is a group. Change the teal to your subject colour and the orange finish to an accent colour. A school that colour-codes subjects can give every unit plan a recognisable look.
Displaying the Roadmap for Students
Students learn better when they know where a unit is going. Project the roadmap on the first day and revisit it every Monday: We are here, at Week 2. Some teachers print a large copy for the classroom wall and move a sticky note along the road as the unit progresses.
Linking Units Across the Year
A collection of unit plans becomes a curriculum map. Lay out every unit for the year and check that skills build sensibly: food chains before ecosystems, ecosystems before human impact. Gaps and repetitions show up quickly when every unit uses the same format, and the roadmap headers make the sequence easy to present to parents at a curriculum evening.
Reviewing a Unit After Teaching It
The unit reflection box on page two is easy to skip and costly to forget. While the unit is fresh, note what took longer than planned, which assessment results surprised you, and which resources worked. Next year, those notes turn a good unit into a great one.
Unit Plan Questions
Can I add a third page?
Yes. Add a page in the editor for a rubric, a vocabulary list, or a resource bank.
Are both pages in one file?
Yes. The template has two pages; Download As PDF exports both.
What size is it?
US Letter landscape, 11 x 8.5 inches, two pages.
Can the weighting column hold points instead of percentages?
Yes. Edit the column header and type points instead.