Who is a teaching assistant, and why do they need their own card?
Teaching assistants, teacher aides and paraeducators are in the classroom all day. They help small groups read, support students with additional needs, supervise breaks and keep lessons moving. Yet they are the staff who most often get mistaken for volunteers or parents, because their card looks the same as everyone else’s or does not exist at all. This teaching assistant ID card template gives them a clear, friendly credential that names the role, the class they support and the teacher they work with.
What is different about this layout?
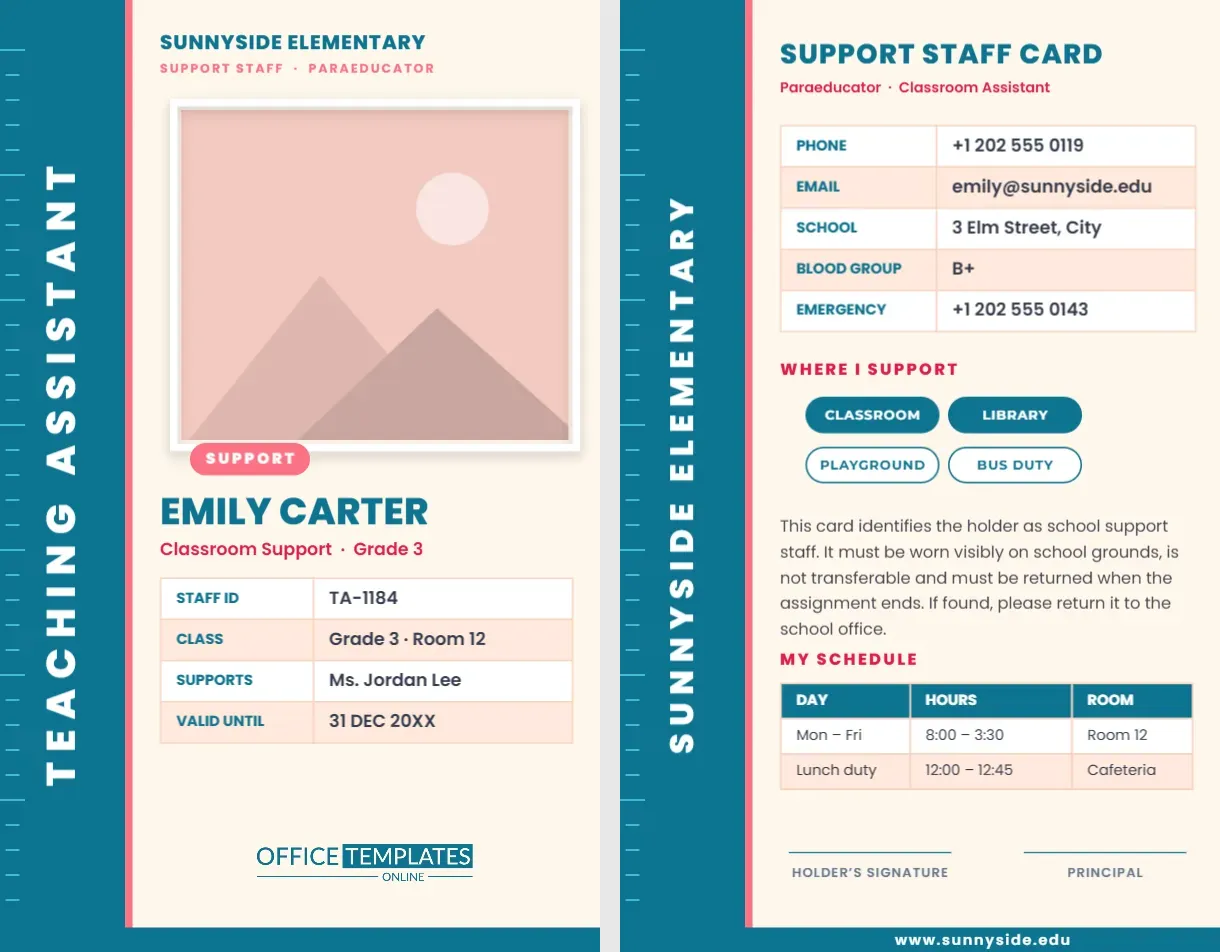
Most of our teacher ID cards run their titles across the top. This one turns the title on its side. A teal band runs down the left edge with “Teaching Assistant” set in tall white capitals, so the role can be read from across a corridor even when the card is turned slightly on a lanyard. A coral stripe and small ruler ticks add a classroom touch, and the cream background keeps the card warm rather than clinical.
Reading the front
School line
At the top, the school name and the words “Support Staff · Paraeducator” set the context. Adjust them to your setting: “Learning Support Assistant”, “Classroom Aide” or “Special Needs Assistant”.
Photo
A generous rectangular photo takes up much of the card. It has a white border and a soft shadow, and a small coral “Support” pill hangs off the lower corner. The photo slot is pattern-filled, so Replace Image crops your picture into the frame without changing its size.
Name and job description
The name is set in bold teal, with a line below it in coral, such as “Classroom Support · Grade 3”. The line tells anyone reading the card where this person works.
Assignment table
Four rows record the staff ID, the class or room, the teacher supported and the valid-until date. The “Supports” row is what sets this card apart: it tells visitors that the assistant works alongside a named teacher, which builds trust and makes the working relationship clear.
Reading the back
The reverse repeats the teal band, this time with the school name running vertically. There you will find:
- A contact table with phone, email, school address, blood group and emergency contact.
- A “Where I Support” section with four chips: Classroom, Library, Playground and Bus Duty. Filled chips show where the assistant works.
- A short paragraph explaining that the card must be worn visibly and returned when the assignment ends.
- A “My Schedule” table with days, hours and rooms, ready for the assistant’s real timetable.
- Two signature lines for the holder and the principal.
Roles this card can represent
- Teaching assistant and teacher aide
- Paraeducator and paraprofessional
- Learning support assistant
- One-to-one aide for a student
- Classroom volunteer coordinator
- Playground and lunch supervisor
How to fill it in
- Replace the placeholder with a clear portrait in good light.
- Type the assistant’s name in the teal line.
- Change the coral line to the job title and grade or year group.
- Complete the assignment table, including the supervising teacher.
- Switch to page 2 and set the schedule table and the chips.
- Download the file as a PDF, PNG or JPG.
A note on privacy and pupils
Many assistants work with children who have additional needs, and schools rightly treat that information with care. Never put a student’s name or a diagnosis on a staff card. The “Supports” row in the table should name the supervising teacher or the class, not a pupil. Keep sensitive details in your management system and let the card carry only what a visitor needs to see.
Making the card work day to day
Assistants move between classes, playgrounds and buses, so a card that is legible at a distance saves questions. Wear it on a lanyard at chest height, not tucked into a pocket, and keep a spare for days when it goes missing. Because the vertical title runs down the left edge, choose a lanyard clip that does not cover it. If assignments change each term, update just the class and teacher rows in the table and reprint.
Printing guidance
The card is portrait CR80, 2.125 x 3.375 inches. Use 30 mil PVC or a heavy card stock, laminate paper prints and round the corners. The teal band uses a lot of ink, so let the print dry before handling. Print in colour at 300 dpi, and check a test card to see that the small ruler ticks and the thin text are still crisp.
Short answers to common questions
Can the same card be used for a paraeducator and a classroom aide?
Yes. They are different names for similar jobs, so simply retype the job line to match your school’s term.
Can I add a second photo of the supervising teacher?
You can upload any image and place it on the card, though most schools keep the card simple with a single photo.
What if the assistant works at two schools?
Create two versions with different school names and schedules, or add both schools to the schedule table.
Wording for different support roles
Support roles are described differently from one school system to another, and the labels matter to the people who hold them. Here are lines you can type into the coral job line or the vertical band:
- Learning Support Assistant · Key Stage 2
- Special Needs Assistant · Resource Room
- Bilingual Classroom Aide · Grade 1
- Reading Intervention Aide · Grades 2 and 3
- Lunchtime Supervisor · Playground
If a longer title does not fit in the vertical band, shorten it or reduce the font size slightly. The band has plenty of length, so most titles fit on one line.
It also helps to keep the wording consistent across the school. If the staff handbook says “teaching assistant”, use that on the card, on the door sign and in emails, so that visitors and new parents learn one name for the role and recognise it everywhere.
The adults who make classrooms work deserve a card that says so. Open the template, add the assistant’s details and print a ready-to-wear credential.