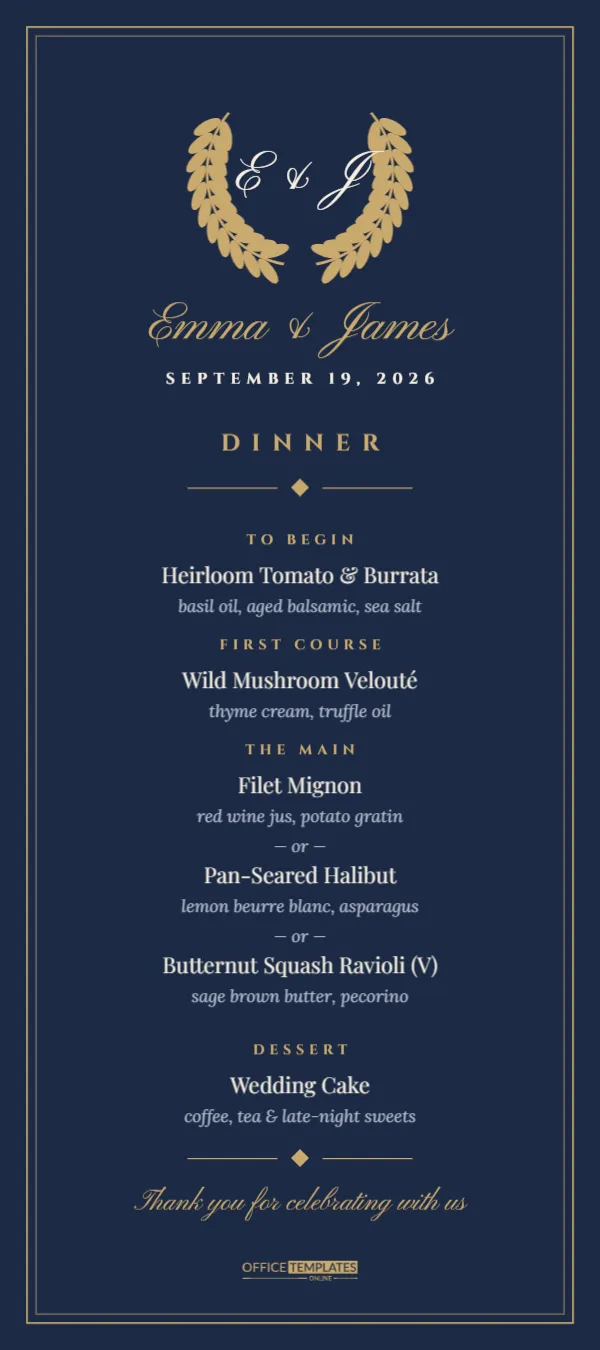
At a wedding reception, the menu card is one of the first things guests pick up when they find their seat. It tells them what’s coming, helps them remember their meal choice, and becomes a small keepsake of the day. This Wedding Reception Menu Card Template is classic and romantic, with a deep navy card, gold details, a laurel wreath around the couple’s monogram, and each course set with care. It is designed at the tall 4 x 9 inch size that fits beautifully on a dinner plate or tucked into a folded napkin.
The Card in Detail
The card is portrait, 4 inches wide and 9 inches tall. The background is a rich midnight navy, framed by two fine gold lines inset from the edge: a slightly heavier outer line and a hairline inner one.
At the top, a gold laurel wreath (two leafy branches curving up from the base) surrounds the couple’s initials, E & J, in flowing cream Pinyon Script. Beneath the wreath are the full names, Emma & James, in gold script, the date SEPTEMBER 19, 2026 in small cream Cinzel capitals, and the word DINNER in widely spaced gold capitals. A pair of gold rules with a small gold diamond between them marks the start of the menu.
The courses are centred and follow a consistent pattern: a small gold capital label, the dish in cream Playfair Display, then a short italic description in soft blue-grey:
- To Begin: heirloom tomato and burrata.
- First Course: wild mushroom velouté.
- The Main: a choice of filet mignon, pan-seared halibut, or butternut squash ravioli (V), separated by small — or — lines.
- Dessert: wedding cake with coffee, tea, and late-night sweets.
A second diamond divider closes the menu, followed by Thank you for celebrating with us in gold script and a small gold logo at the foot.
Wording Ideas for Your Menu Card
Couples often get stuck on the small lines of text. Here are a few alternatives for each part of the card, so you can mix and match your own tone:
Heading:Dinner · Wedding Breakfast (the British term for the reception meal) · Menu · To Celebrate
Choice line:— or — · choice of · please enjoy one of the following
Closing:Thank you for celebrating with us · Eat, drink and be married · With love and gratitude, Emma & James · Let’s dance!
Extras:Signature cocktail: The Bees Knees · Late-night snack: wood-fired pizza at 10 pm
If guests chose their mains in advance, many couples add a small symbol next to each option, such as a star or a leaf, and put the same symbol on the guest’s place card so servers know who ordered what.
Personalizing the Card
- Monogram: double-click E & J inside the wreath to type your initials. Two letters with an ampersand look most balanced; for a single family initial, enlarge the text slightly.
- Names and date: retype the script names and the date line. Short names look lovely on one line; for longer names, reduce the size a little.
- Courses: each label, dish, and description is its own text box. Rewrite them to match your caterer’s menu, delete a course or add a cheese course.
- Colours: the navy background and gold details can take on your wedding palette, for example emerald and gold, burgundy and rose gold, or dusty blue with silver. The laurel wreath is one group, so it recolours in a single step.
- Table or guest name: add a small text line under the date, such as Table 5 or a guest’s name, to turn the menu into a place card too.
Printing Wedding Menu Cards
The 4 x 9 inch size is a standard wedding menu format, and there are two easy ways to print it:
- At a print shop: download the PDF and ask for 4 x 9 inch cards on heavy stock (120-130 lb, or about 300-350 gsm) with a smooth matte or pearl finish. Pearl paper makes the gold elements shimmer under candlelight.
- At home: print two cards side by side on a sheet of 8.5 x 11-inch card stock (two 4 x 9 cards fit with room to trim), then cut them with a paper trimmer.
For a luxury touch, some printers can add real gold foil to the laurel wreath and frame. Ask your printer about foil or gold ink, which a regular printer can’t reproduce. Otherwise, a rich metallic-looking gold ink still looks elegant on navy.
Working With Your Caterer
Ask your caterer for the final menu wording in writing, including exact dish names and any dietary marks, a week or two before you print. Caterers sometimes adjust a garnish or side at the tasting, and it’s much easier to change one line in the editor than to reprint two hundred cards. Check the spelling of any French or Italian terms, confirm which dishes are vegetarian or gluten-free, and agree on the order of courses. Send your caterer a PDF of the finished card too, so their servers can use it as a quick reference during dinner service.
Styling Ideas for the Reception Tables
- Lay the card on each charger plate and add a sprig of eucalyptus or a single bloom.
- Fold a napkin into a pocket and slide the card inside so the monogram peeks out.
- Tie a velvet ribbon around the card and napkin together in your wedding colour.
- Print one extra and frame it at the bar or escort-card table.
Couples Often Ask
How many menu cards should we print?
One per guest is traditional, plus about 5% extra for spares and keepsakes. Some couples print one per couple or two per table instead to save costs.
Can we list dietary options?
Yes. Mark vegetarian or vegan dishes with (V) or (VG), as the template does for the ravioli, and add (GF) for gluten-free options.
Does it work for a rehearsal dinner?
Absolutely. Change DINNER to Rehearsal Dinner, update the date, and list that evening’s menu.
Can we have it in a lighter colour?
Change the background to ivory or blush, and switch the cream text to navy or charcoal so it stays readable.
A Beautiful Detail for Your Day
Add your monogram, names, and menu, and print a card for every seat at your reception. It’s a small detail, and guests will notice it, read it, and often take it home.