Four Reasons Children Love a Snowman Envelope
There is no need to explain a snowman to a child. He is round, he is smiling and he is wearing a scarf. Here are four reasons why this envelope works for classrooms, families and clubs.
One: The Characters Are Friendly
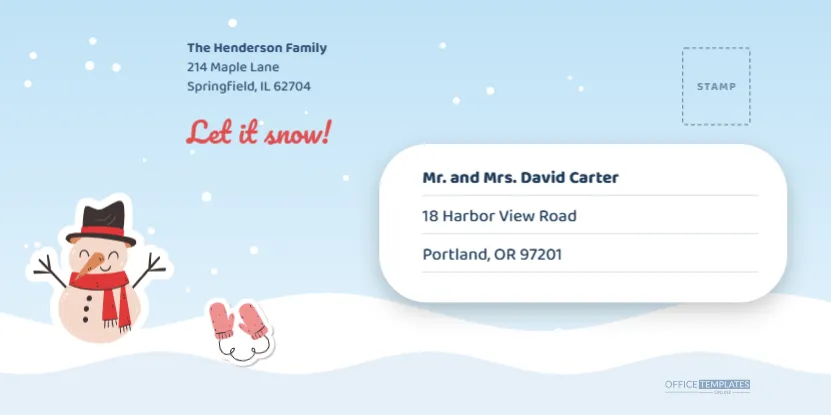
A smiling snowman in a black hat and red scarf waves from the lower left, with twig arms and a carrot nose. Next to him, a pair of pink mittens rests on the snow. Both are editable vector artwork with a white sticker border, so they look like stickers pressed onto the envelope.
Two: The Colours Are Fresh
The background is a gradient from light blue at the top to almost white near the horizon. Two overlapping snow hills in white and pale blue ripple along the bottom. Small snowflakes drift in the sky, but they never land on the addresses.
Three: The Address Label Is Big and Friendly
A large white label with very round corners, almost like a cloud, holds the recipient lines. It sits in the centre right, with three lines in Baloo 2, a rounded sans serif, in deep blue, at 13 points, on pale rules. The shape is soft and the type is clear, so even a child can read it.
Four: The Greeting Is Playful
Let it snow! is written in Pacifico, a bold brush script, in warm red. It sits above the snowman and the mittens at 21 points, bouncy and bright.
Snowman Envelope Layout Facts
The envelope is a DL, 220 by 110 millimetres, in landscape, the long envelope that holds an A5 card folded in half or a letter folded in thirds. The return address sits top left in Baloo 2, in dark blue. A dashed stamp box sits at the top right.
| Element | Colour | Where |
|---|---|---|
| Sky | Light blue to white | Full page |
| Snow hills | White and pale blue | Bottom third |
| Snowman | Cream, black hat, red scarf | Lower left |
| Mittens | Pink | Beside the snowman |
| Address label | White | Centre right |
Changing the Snowman Greeting and Label
- Click Let it snow! and retype it. Try Hello from the snow, Happy Holidays or the child’s name.
- Click the return address and type your own.
- Click the recipient lines on the label.
- Select the snowman to move or resize. Make him larger for a bolder look.
- Delete the mittens or replace them with another winter item.
Craft Ideas for Families and Classes
Print the envelopes in black and white and let children colour them in with crayons. Add cotton wool for snow, or use a white gel pen for snowflakes. Write the address with a dark marker after colouring, so that it stays clear. A class can make a snowman card to match, with a folded paper hat and a button nose.
Printing the Sky Blue Snowman Envelope
Print on bright white paper for the freshest blue. The gradient is gentle, so even a basic printer will manage. If you plan to colour by hand, print on a matte paper that takes crayon well, and avoid glossy stock. Keep the address label white and clean.
Snowman Envelope Queries From Teachers
Can I turn the snowman into a snow woman or a penguin?
Yes. Delete the snowman and insert another vector from the library, or recolour the scarf and hat.
Is the label too big for a long address?
No. It holds three lines comfortably, and you can resize it if needed.
Can I use it for a birthday in winter?
Yes. Change the greeting to Happy Birthday and keep the rest.
Craft Ideas: A Class of Snowmen Letters
A class can make a wall of snowman envelopes. Each child decorates a printed envelope with cotton wool snow, buttons and a drawn face, then writes a letter to a pen pal or a grandparent. Display the finished envelopes on a string across the room before they are sent. It is a simple way to practise writing, and the results look charming.
Teaching Children How to Address an Envelope
Show them the three zones: the sender at the top left, the stamp at the top right and the recipient in the middle. Let them practise on the printed envelope, name first, street second, town last. Explain that the postal worker reads from top to bottom, so the order matters. A child who understands the layout will remember it for years.
Keeping the Design Cheerful for Winter Birthdays
A snowman is just as welcome in January as in December. Change the greeting to Happy Birthday, add a candle to the snowman’s hat, and the envelope becomes a winter birthday card holder. Children born in cold months will enjoy having a snowy birthday of their own, and the same design works for a baby shower in a snowy season.
Safe Materials for Young Crafters
If children will decorate the printed envelopes, choose non toxic glue and washable markers, and keep scissors age appropriate. Cotton wool and paper shapes are safe additions, while glitter can be messy and is better kept for an adult supervised project.
Printing Black and White Versions for Colouring
If you want children to colour their own snowman, print a version with only outlines. Delete the fills in the editor, keep the strokes and print on plain white paper. Crayons, markers and glitter glue all work well. The label stays white so the address is still easy to read after colouring.
Sending a Winter Letter to a Faraway Grandparent
A child’s letter is a precious thing for a grandparent. Pair the snowman envelope with a drawing, a short list of what they have done this month and a photograph if you like. The cheerful front tells the grandparent that good news is inside before they open it.
Writing a Simple Letter Template for Young Children
Give a child a short frame to fill in: Dear, my favourite thing about winter is, this year I learned, and Love from. Four lines are enough for a first letter, and each one can be a sentence or a drawing. Print the frame on a half page and fold it into the envelope. The structure helps children who find a blank page daunting.