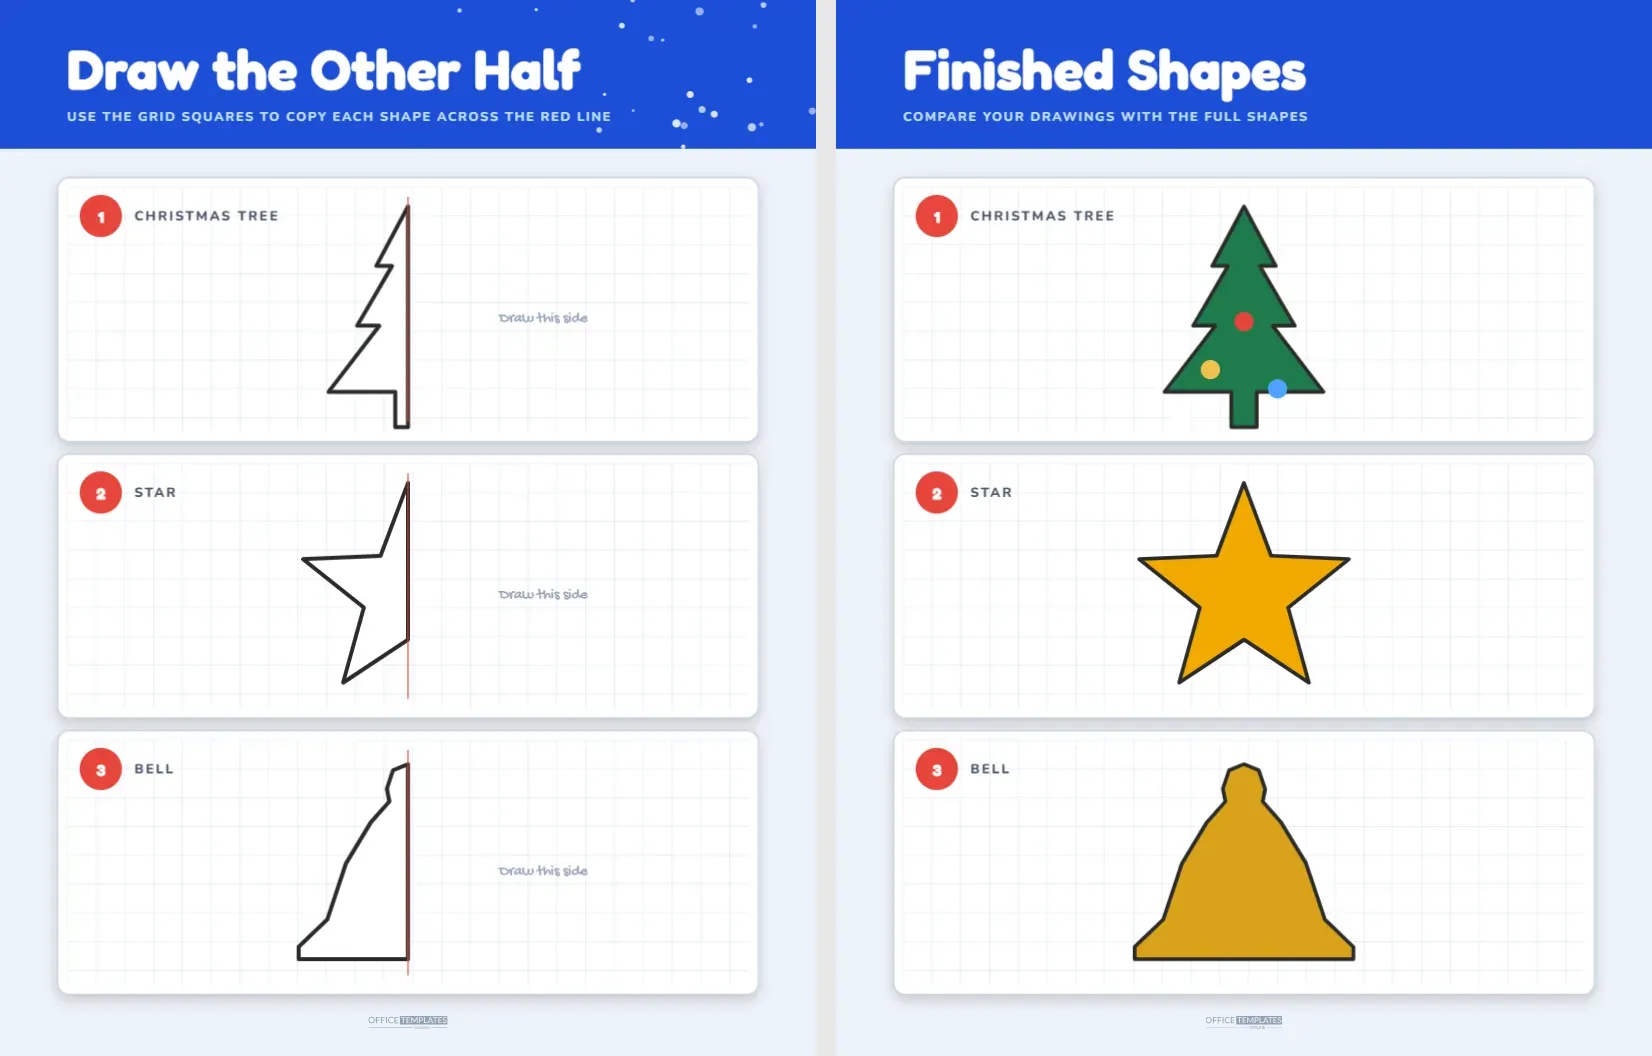
Symmetry sounds like a maths word, but a child already understands it. Fold a paper heart, and both sides match. This activity asks children to complete three Christmas pictures that have been cut in half, copying every line from one side of a red dashed line to the other. A pale grid helps them count squares, and the finished shapes on page two let them check their work.
The Three Panels
| Panel | Shape | What makes it tricky | Skill practised |
|---|---|---|---|
| 1 | Christmas tree | Three zigzag tiers and a trunk | Copying repeated steps |
| 2 | Star | Five points at slanted angles | Matching diagonal lines |
| 3 | Bell | A curved flare with a rim | Copying a smooth curve |
How Each Panel Is Built
Each panel is a white card with a soft shadow on a pale blue page. A fine grid of squares, each three tenths of an inch wide, covers the whole panel and gives the child something to count. A numbered red circle and the name of the shape sit in the top left corner. The left half of the shape is drawn with a heavy dark outline, and a red dashed line runs down the centre as the axis of symmetry. The right half of the panel is blank except for a faint reminder, Draw this side, written in a handwritten face.
The Method That Works for Every Shape
- Find the point where the shape touches the red line at the top.
- Count how many squares the first line travels to the left and which way it slopes.
- Make a mark on the right side the same number of squares away from the red line.
- Join the marks with a ruler or a steady hand.
- Repeat for each corner or curve until the shape closes at the bottom.
- Look at both halves together and check that they could fold on to each other.
The Finished Shapes on Page Two
Page two shows the same three panels with the full shapes filled in colour: a green tree with coloured baubles, a golden star and a bell in dark gold. The grid is still behind them, so children can compare their drawing square by square. It also works as a colouring page, since the finished shapes are large and clear. If a child’s drawing does not match, encourage them to find the first square where the lines differ and fix it from there.
Why Symmetry Is Worth Practising
Symmetry is the beginning of geometry. A child who can mirror a shape understands reflection, one of the basic moves in maths, and sees patterns in nature, from butterflies to snowflakes. Drawing along a grid builds careful counting and estimation, and copying a curve trains the eye to notice how lines bend. Teachers often use symmetry exercises to bridge art and mathematics, since they appeal to children who prefer drawing and to those who prefer numbers.
Adjusting the Difficulty
For younger children, hide the squares: select the grid group and press delete, and the shapes become a simple fold and copy task. Leave the grid on for children who like to count, or make it finer for older ones. To raise the challenge, replace one of the left halves with a more complex shape, such as a gingerbread man or a snowflake. Keep the red dashed line in the centre, and make sure the shape you draw is symmetrical so that the exercise remains fair.
Editing the Shapes
Every shape is a vector polygon, so you can reshape it by editing its points or recolour it with a click. To add a fourth panel, duplicate any panel, change its heading and replace the left half with your own outline. If you want children to use colour, give each half a different fill to show the mirror effect, such as red on the left and blue on the right. The grid is a single group, so it can be recoloured, resized or removed in one step.
Ways to Turn It Into a Group Game
- Partner draw: one child draws the left half of a new shape and a partner completes the right half.
- Mirror challenge: use a small mirror along the red line to see the full shape appear.
- Timed round: see who can finish the tree in the shortest time with careful lines.
- Design your own: give each child a fresh sheet of squared paper and ask for a half shape for a friend to finish.
Materials and Printing
A sharp pencil and an eraser are the best tools, since children will make small adjustments. A ruler helps for straight lines, and a thin black marker can be used for a final outline. Print on plain white paper, and use the page at full size, since the grid squares are designed for a comfortable pencil width. The pale grey lines print lightly, so they guide without distracting. If you plan to reuse the page, slip it into a clear sleeve and use a dry erase marker.
Talking About Symmetry Away From the Page
Once a child has finished the page, symmetry starts to appear everywhere. Look at a leaf, a butterfly drawing, a snowflake, the front of a house or the letter A. Ask the child to find a line that cuts each one into two matching halves and point to it. A small mirror makes this fun: hold it upright along the line and the whole shape appears. Some letters have a line of symmetry and some do not, which makes a nice follow up game at the kitchen table. A child who notices symmetry in the world has started to think like a mathematician.
Working Together on a Bigger Piece
For a group activity, draw half a large Christmas tree on a long sheet of paper, run a line down the middle and give each child a section of the right side to complete. Each child copies the matching section on the left. When the pieces come together, the whole class has made a giant symmetrical tree. This approach works well for a classroom display, and it shows younger children that careful work on a small part contributes to a bigger whole.
Questions Teachers Ask About This Page
Does it need any special equipment?
Only a pencil. A ruler and an eraser are helpful extras.
Which year group is it for?
It suits roughly ages six to ten. Younger children can try the star, which has the fewest lines to copy.
Can I make my own shapes?
Yes. Draw a half shape on the left side of any panel with the polygon or line tools, and keep the red line as the guide.
Is the grid necessary?
It is a helpful guide for counting, but you can remove it for confident children.