The most trusted real estate agent in any neighbourhood is often the one who actually lives there. Homeowners like an agent who knows which streets flood, which schools are popular, and what the house three doors down sold for. This door hanger introduces you as exactly that person. It opens with a cheerful Hi, neighbour! Over a hand-drawn street map with a red pin, it shows your friendly face in a big circle and tells your story in a few warm sentences. The back proves your local knowledge with recent nearby sales.
A Street Map, a Pin and a Friendly Face
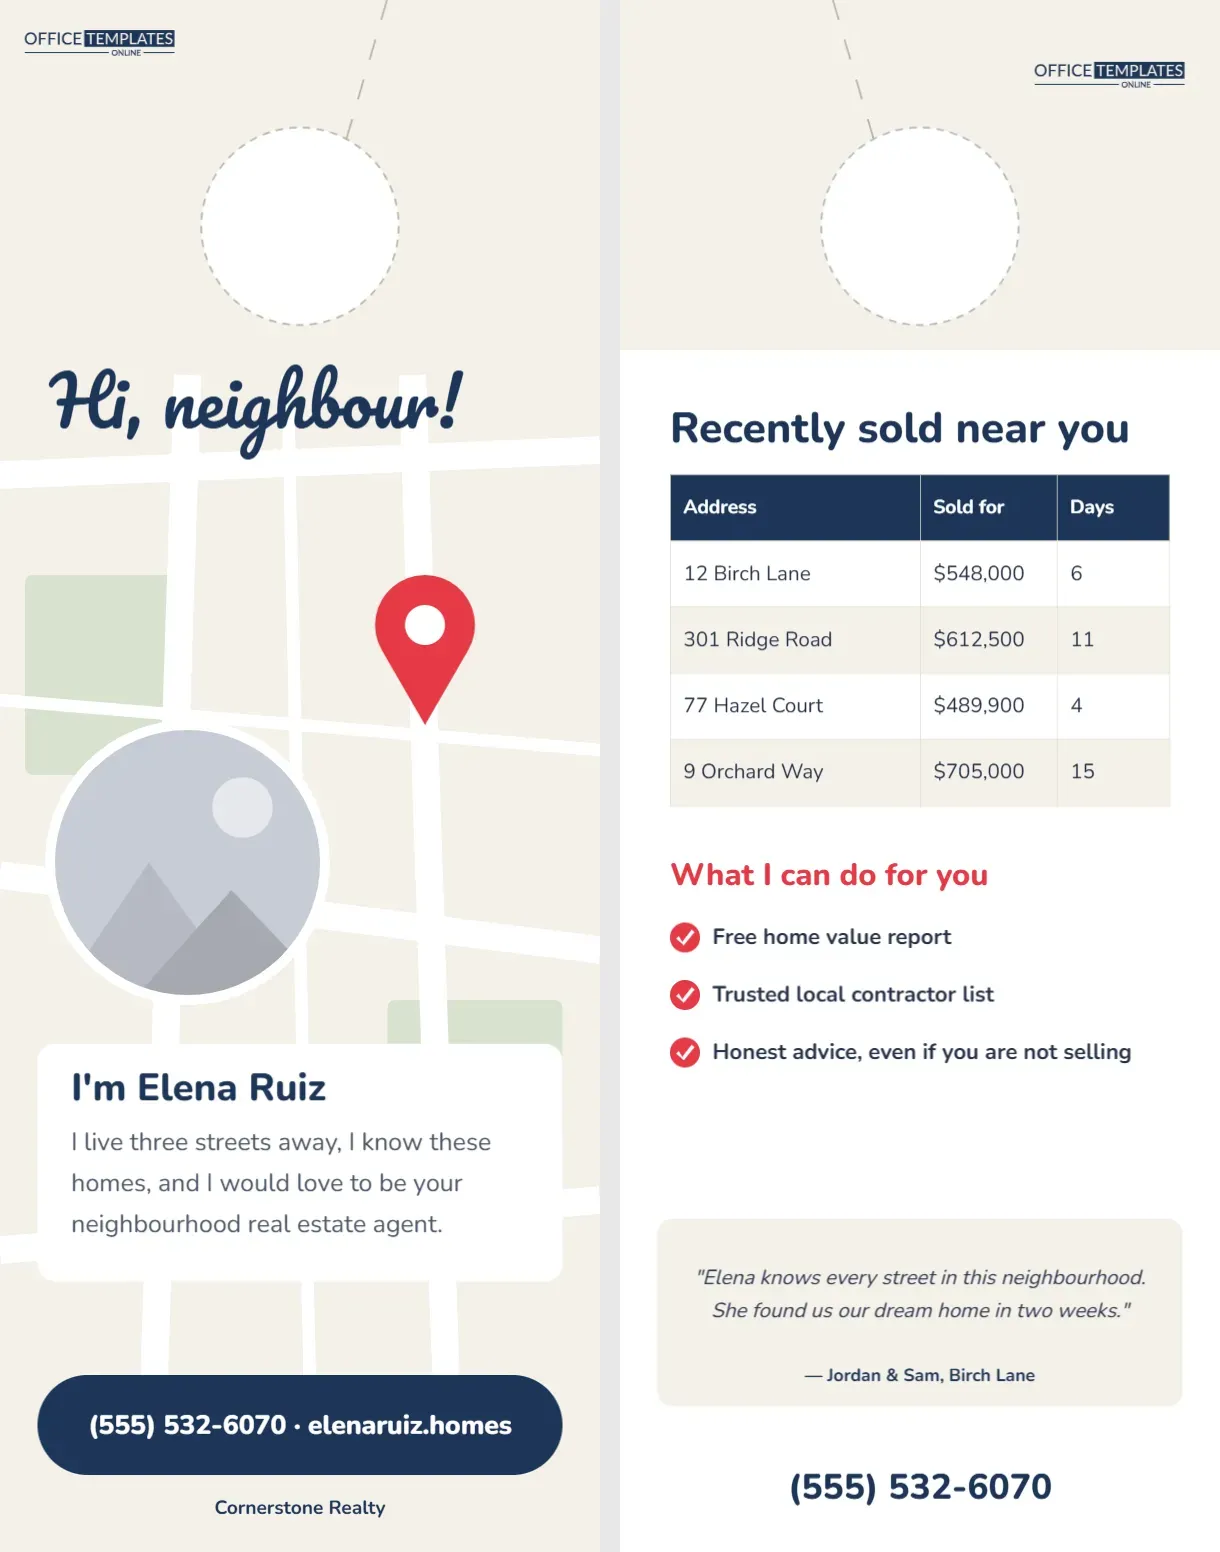
This 4.25 x 11-inch hanger prints on both sides. The front background is a soft map beige. White roads cross the card at gentle angles, with thinner side streets between them and two pale green blocks for parks. A red map pin marks your street near the top right. The greeting Hi, neighbour! is written in navy Pacifico above a large round agent photo with a thick white ring. A white card below introduces I’m Elena Ruiz in bold and explains: I live three streets away, I know these homes, and I would love to be your neighbourhood real estate agent. A navy pill gives the phone and website, with the brokerage name underneath.
Why Agents Should Introduce Themselves Like Neighbours
Most real estate marketing talks about the agent’s achievements. That has its place, but a first introduction works better when it feels personal. A smiling photo, a first name, and I live three streets away create a human connection that awards and sales volume cannot. Homeowners keep a friendly note from a neighbour; they recycle a brochure from a stranger.
The Back: Proof of Local Knowledge
The back’s headline, Recently sold near you, sits above a table with addresses, sale prices, and days on market for four nearby homes. What I can do for you follows in red, with three ticks offering a free home value report, a trusted local contractor list, and honest advice, even if the homeowner is not selling. A beige box holds a testimonial from local clients, and the phone number is repeated at the bottom.
Updating the Recent Sales Table
The sales are in a real table. Select it and use Edit Table Data to enter real recent sales from the MLS or public records, ideally within a few streets. Use Add Row to show more. Check your local rules about advertising other agents’ sales; in many places you may show sold data with a note that sales were not necessarily your own listings.
Neighbourhood Services That Build Goodwill
| Service | Why homeowners value it |
|---|---|
| Annual home value update | Useful for refinancing, insurance and planning |
| Trusted contractor list | Saves time finding plumbers, painters and roofers |
| Local event calendar | Builds community and gives a reason to stay in touch |
| Free notary or document help | Practical value beyond buying and selling |
| Moving checklist | Helpful for families relocating nearby |
Putting Your Photo in the Circle
The large circle on the front is a photo slot. Choose Replace Image and upload a warm, recent portrait; it fills the circle and keeps the white ring. A natural photo taken outdoors, maybe in a local park, suits the neighbourly tone better than a stiff studio portrait.
Writing Your Introduction
The paragraph in the white card should sound like you speaking. Mention how long you have lived in the area, something you love about it (the farmers’ market, the school, the trails), and how you can help. Keep it to three or four lines. Avoid sales language; let the warmth do the work.
Moving the Map Pin
The red pin is a small group of shapes on top of the street map. Drag it to sit near the top of the map or anywhere it does not overlap your photo. The roads and parks are another group; recolour them to match your brand or make them more subtle.
Navy, Red and Map Beige
The palette is calm and approachable. If your brokerage uses different brand colours, change the navy pill and the red accents. Keep the beige map background; it gives the card the feel of a printed street map and sets it apart from glossy agent mailers.
Hanger Hole and Slit Guides
At the top of both sides, a dashed white circle marks the knob hole and a dashed line marks the slit. Your printer will cut both with a door hanger die; for a test batch, use a circle punch and scissors.
Printing an Introduction Hanger
Download as a PDF with bleed and crop marks. A matte or uncoated stock suits the friendly, paper-map feel better than high gloss, and it takes a handwritten note if you want to personalise a few cards. A 14 pt weight hangs nicely.
Personal Touches That Get Responses
Some agents add a handwritten P.S. to each hanger, such as Love your garden! or Welcome to the neighbourhood! for new arrivals. It takes time, but it dramatically increases the chance that a homeowner keeps the card and remembers your name. For a large area, personalise hangers for the streets closest to your own home.
Farming a Neighbourhood Over Time
An introduction hanger is the first step in farming a neighbourhood. Follow it every two or three months with something useful: a market update, a Just Sold announcement, or an invitation to a community event. Consistency over a year or two builds the recognition that brings listings.
Joining Local Life
The best neighbourhood agents show up beyond real estate: sponsoring the school fun run, volunteering at the park clean-up, or hosting a pumpkin giveaway. Mention one community activity on your hanger to show you are part of the place, not just selling it.
Realtor Introduction Hanger FAQ
Can I use this if I am new to the area?
Yes. Change the text to: I just moved to the neighbourhood, and I’d love to meet you.
Can I add my team?
Yes. Replace the single photo with a team photo and adjust the introduction.
What size is the hanger?
4.25 x 11 inches, with a front and a back.