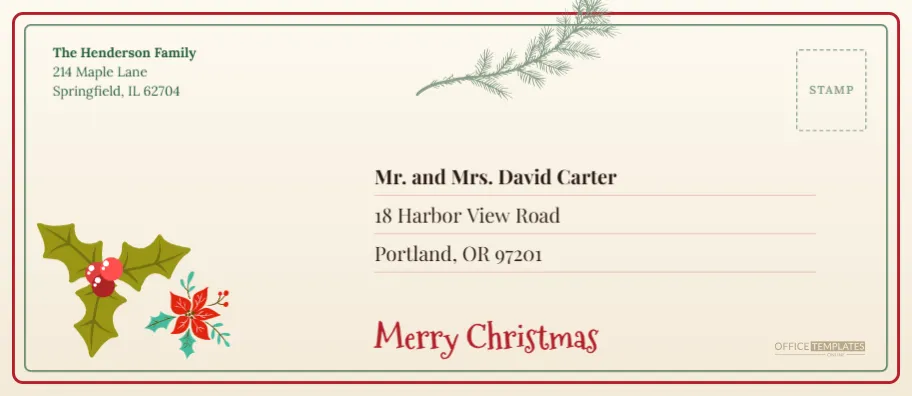
Every December a small stack of envelopes goes out of most households. Some hold cards, some hold letters, and a few hold the cheque that a grandchild has been waiting for. The first thing the person on the other end sees is the front of the envelope, and a handwritten scrawl on plain white paper tells them very little about the care inside. This classic Christmas envelope gives that first glance some warmth. It is a traditional, cream coloured design with a red and green border, a sprig of holly, a poinsettia and a handwritten style greeting, drawn to fit a standard #10 envelope.
What the Holly Border Envelope Looks Like
The design is built for the #10 envelope size, 9.5 by 4.125 inches, in landscape orientation. The background is a soft cream gradient that moves from almost white at the top to a pale parchment at the bottom edge. A rounded red frame runs close to the edge of the page, and a thinner green frame sits just inside it, so the border reads as two layers, like a wrapped parcel. Neither line touches the address area.
In the lower left corner, a holly sprig with red berries sits beside a poinsettia sticker drawn in red and teal. Both are editable vector artwork, so you can recolour them or ungroup them in the editor. To the right of the poinsettia, the words Merry Christmas appear in a playful, slightly wobbly font called Mountains of Christmas, set in the same deep red as the border. A pale pine sprig hangs down from the top edge near the middle, and a small dashed box in the top right corner marks where a stamp will go.
Reading the Layout as a Postal Map
An envelope is more than a decoration. It has jobs to do, and the layout should respect them. The table below lists the zones on this design and what each one is for.
| Zone | Where it sits | What it holds |
|---|---|---|
| Return address | Top left, inside the green frame | The sender’s name and address in green Lora type |
| Stamp box | Top right corner | A dashed outline for the stamp or postage label |
| Recipient block | Centre right | Three lines in Playfair Display with fine rose coloured rules |
| Greeting and art | Bottom left | Holly, poinsettia and the Merry Christmas script |
| Quiet strip | Along the bottom edge | Kept free so sorting machines can read the address |
Filling In the Names and Addresses
- Open the template in the editor and click the return address. The sample reads The Henderson Family, 214 Maple Lane and Springfield, IL 62704. Type your own name and address over it.
- Click the recipient block and replace the three sample lines. Each line is a separate text box sitting on its own rule, so a longer name or street can be shortened or the font size reduced without moving the others.
- If you are mailing many envelopes, duplicate the page once for each family. Change only the three recipient lines each time.
- Select the stamp box and delete it if you use pre printed postage or a postage label, or leave it as a guide when printing on plain paper.
- Download the finished page as a PDF for print, or as a PNG or JPG for a quick proof on screen.
Changing the Greeting for Other Occasions
Merry Christmas is a single text box, so the same envelope can serve several purposes with one edit. Try Season’s Greetings for mixed company, Joy to the World for a church group or Happy Holidays for a business mailing. The script font is wide, so keep new greetings to about twenty characters, or lower the font size by a point or two. The holly and poinsettia suit any winter message, and removing the poinsettia leaves a lighter, more traditional look.
Colour Choices Behind the Red and Green
The red is a deep, slightly brick tone rather than a bright fire engine red, and the green is a dark pine. They are used in thin lines, not in big blocks, which keeps the envelope feeling elegant. If your Christmas cards use a different palette, select the two frame shapes and change their stroke colours. A navy and silver card would pair nicely with a navy outer frame and a grey inner frame, and a kraft card would suit a brown outer line with a cream inner one. The holly stays green and red because that is how holly looks, but you can ungroup it and recolour the berries if you want a different accent.
Printing the Holly Border Envelope
There are three practical routes. The first is to print the design on a sheet of paper cut to the envelope size, and use it as a wrap or a pattern. The second is to send the PDF to a print shop that can print on ready made #10 envelopes, which gives the most professional result. The third is to print the recipient and return addresses on adhesive labels and use a plain envelope. Home printers vary a lot in how they handle envelopes, so test with one before you commit to a batch of fifty. Use matte stock rather than gloss, since glossy envelopes take pen and stamp ink badly.
The cream background looks richest on a slightly warm white paper. On bright white stock it still looks fine, but the border gains a little more contrast. If your printer cannot print to the very edge, ask for a version with a white margin, or trim the printed sheet by a quarter of an inch.
A Note About the Logo and Mailing Rules
A small OTO logo sits near the bottom right of the preview, in a pale tan that blends with the paper. It is there for branding and is easy to delete. Postal sorting machines usually need a clear strip along the bottom edge of the envelope, so if you plan to post a large batch, delete the logo and check the current guidance from your post office. Keep the recipient lines dark against the background, and avoid putting any decoration behind them.
Questions People Ask About This Envelope
Can I use this template for a different envelope size?
Yes. Open the template, change the canvas size to match your envelope, and move the elements. The frame shapes stretch, and the art can be scaled. The #10 layout works best with a wide format like the 9 by 4 inch or DL sizes.
Can I add a photo?
The template has no photo slot, but you can insert an image from the editor and place it in the empty space above the holly. Keep it away from the address area.
Will the fonts work when I download?
Yes. All fonts come from Google Fonts and are embedded when you export to PDF or PNG.
Does the envelope include a card?
No. It is the front of an envelope only. Pair it with the Christmas card templates elsewhere on the site for a matching set.
How do I keep every envelope in a batch looking the same?
Fill in the return address once, duplicate the page for each recipient and only change the three recipient lines. Save the master file under a clear name so you can reuse it next year.