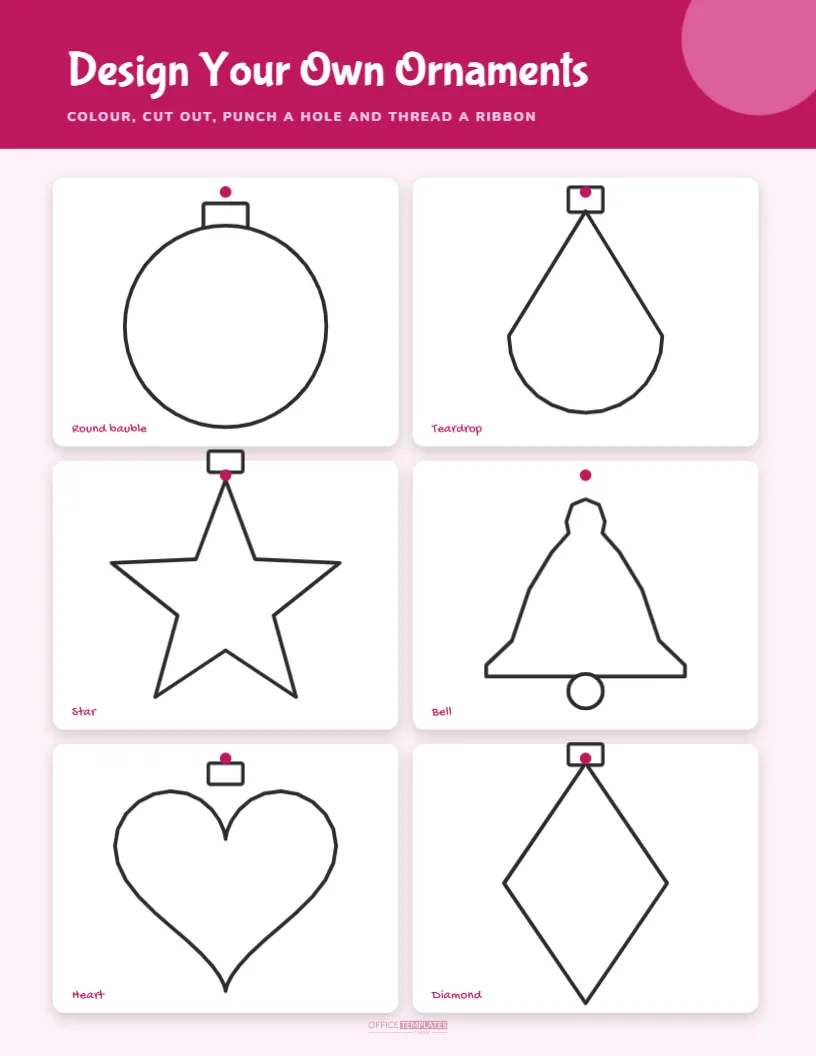
A handmade ornament does more than hang on a tree. It carries a year, a name and a memory. This craft sheet gives children six blank ornament shapes in a magenta and pink page, and a second page of pattern ideas to copy when the blank space feels too big. Cut them out, punch a hole, thread a ribbon and they are ready for the branches.
Six Shapes, Six Starting Points
| Shape | Feels like | Pattern that suits it |
|---|---|---|
| Round bauble | The classic tree ornament | Stripes or dots, wrapped around the circle |
| Teardrop | An icicle or a raindrop | A zigzag from top to bottom |
| Star | A topper or a window star | Rings that follow the points |
| Bell | A sleigh bell | Waves along the flare |
| Heart | A gift for someone special | A name in the middle with dots around it |
| Diamond | A jewel or a gift tag | Checks, as on a harlequin costume |
What the First Page Looks Like
A deep magenta band at the top carries the title Design Your Own Ornaments in a rounded display face, with a light pink circle in the corner. Below, six white cards with soft shadows sit in two columns and three rows. In each card, a bold dark outline traces the shape, with a small metal style cap and a tiny magenta dot above it that shows where to punch the hole. The shape name is written in the bottom corner in a handwritten face.
Page Two, Pattern Ideas
The second page shows eight small tiles in two rows of four: Stripes, Dots, Zigzag, Checks, Snowflakes, Stars, Waves and Rings. Each is drawn in a different colour so that children can see how a pattern looks when filled with a single hue. Under the tiles, four numbered steps in magenta circles explain how to make the ornament: colour your shape, add a pattern with a pen or glitter glue, cut it out and punch a hole, then thread a ribbon and hang it.
Materials You Will Want
- Coloured pencils, markers or crayons for the main design.
- Glitter glue, metallic pens and stickers for sparkle.
- Scissors that suit the age of the child.
- A hole punch for the top.
- Ribbon, string or twine, about 20 centimetres for each ornament.
- Optional: thin card to glue the ornament to for strength.
Making Ornaments Sturdy Enough to Hang
Printer paper bends under the weight of glue and glitter. Print the sheet on card stock if your printer allows it, or glue the finished paper to a piece of cardboard cut from a cereal box. A double sided ornament is even nicer: glue two cut outs back to back with the ribbon between them. For an ornament that lasts for many years, brush a thin coat of clear glue or varnish over the finished design and let it dry before hanging.
Patterns Explained for Beginners
A pattern is just something repeated. Draw one shape, then draw it again beside the first, and keep going until the space is filled. Alternating two colours makes the pattern look more interesting. Ask the child to choose a shape and a colour and repeat them. Waves and zigzags are especially good for children who like to draw continuous lines, while dots and checks suit those who prefer small, careful marks. Encourage children to combine patterns, with stripes on the top half and dots on the bottom.
Personalising With Names and Dates
The heart or the round bauble is perfect for a name and a year. Write it in the middle with a marker, and add a little border around it. When the child is grown, the ornament becomes a treasured piece of the tree. Grandparents appreciate a handmade ornament as a gift, and a set of six, one for each shape, makes a charming present from a child to a teacher or a neighbour.
Changing the Sheet in the Editor
All six shapes are editable vectors. You can recolour a shape, resize it or move it, or replace it with a different shape from the library. Pattern tiles on page two are made of simple shapes: bars, circles, zigzag lines and star outlines. Recolour them to match a family theme, or delete the ones you do not need. To create an ornament with a photo, use the editor to add a picture slot to a round shape and print it, so the child’s face sits at the centre of the bauble.
Classroom and Party Use
- Classroom tree: let each child make one ornament and hang them on a branch in the room.
- Party station: set up a table with markers, glue and ribbon for guests to decorate their own.
- Gift tags: cut the shapes smaller and write a name on each.
- Window display: tape the ornaments to a window with clear tape.
Hanging and Gifting Finished Ornaments
When the ornaments are dry, hang them on a branch where the child can see them. Some families keep a special small tree in the child’s bedroom and fill it with handmade pieces. Others wrap each ornament in tissue paper and keep them in a box labelled with the year. Ornaments also make a thoughtful present: add a tag with a short message and the year, and tie a ribbon through the loop. Teachers, neighbours and grandparents are usually delighted to receive something a child has made with care.
What to Do If the Ornament Does Not Hang Straight
A paper ornament sometimes tilts because the hole is off centre. Fold the shape along its centre line before punching, so that the hole lands on the axis. If it still leans, add a small piece of tape or a paper clip at the bottom as a counterweight. Ribbon works better than thin string for heavy ornaments, because it spreads the weight. With a little practice, children learn how to balance their designs, a small lesson in physics hidden inside a craft.
Common Craft Questions
Which shape is the easiest?
The round bauble and the diamond have simple edges and are easiest to cut. The bell has more curves and suits older children.
Can I make bigger ornaments?
Yes. Scale a shape up in the editor and print it on a single page.
How do I hang the ornament?
Punch a hole at the top, tie a ribbon through it and make a loop that fits over a branch.