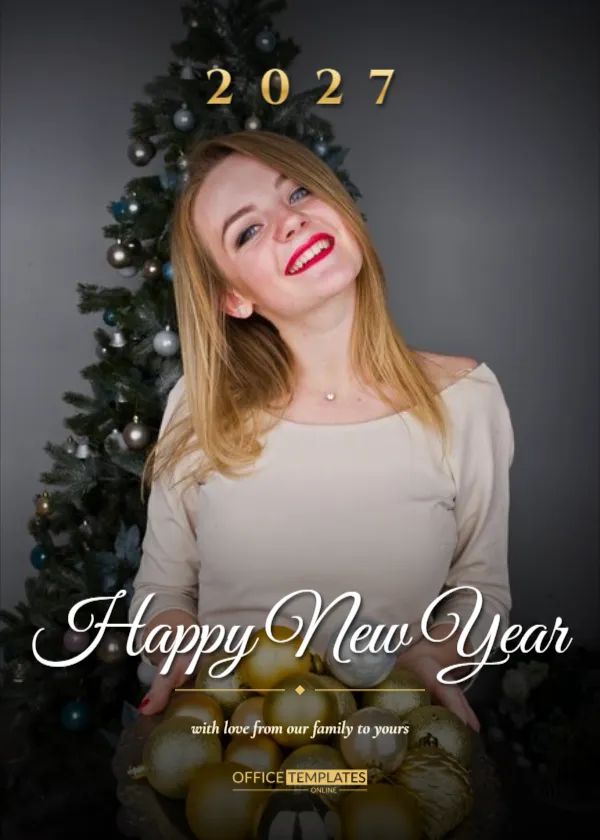
When the photograph is strong enough, let it fill the whole card. This design uses a full-bleed photo slot across the entire 5 by 7 page, with a soft dark gradient at the top for a gold 2027 and a deeper gradient at the bottom for a white script Happy New Year, a gold rule, a line, with love from our family to yours, and the logo. The text is readable on almost any photograph. It suits families, couples, travellers, photographers, and small businesses with a great picture to share.
The Power of a Full Bleed Photo
A full page photo feels generous and immersive. The viewer sees the whole picture without borders, which turns the card into a small print. This is especially effective for landscapes, group portraits, and candid moments.
Choosing the Right Photo for Full Bleed
Pick a portrait or square photo with space at the top and bottom, such as a family standing in a field or on a beach. Make sure faces are in the middle third, away from the text zones. High resolution is essential for a full page.
Replacing the Photo and Adjusting the Crop
Click the photo, choose Replace Image, and pick your picture. Drag the image inside the frame to adjust the crop. If the image looks soft, choose a higher-resolution file, or reduce the size so the quality holds.
The Gradient Overlays for Text Legibility
Two translucent black gradients, one at the top and one at the bottom, darken the edges of the photo so the white and gold text remain readable. Adjust the opacity if your photo is very dark or very bright.
Editing the Gold 2027 and the Script Greeting for the Full Photo Card
The year sits at the top in spaced gold capitals, and Happy New Year sits near the bottom in white script. Replace the greeting with Merry Christmas and a Happy New Year for a double occasion, or edit the family line.
| Photo type | Text placement | Tip |
|---|---|---|
| Family on a beach | Bottom third | Keep faces above the script |
| Snowy landscape | Top and bottom | Increase gradients slightly |
| City at night | Bottom | Use a lighter gradient |
| Pet portrait | Bottom | Crop tight on the face |
Cards for Families and Travellers
A favourite holiday photo, such as a family in front of a landmark, becomes a card that recipients keep. Add a short caption naming the place. The overlay design keeps attention on the picture.
Cards for Photographers and Studios
Photographers can show off their best work. Add the studio name in place of the family line and a booking link for January sessions. The card works as a portfolio piece and a thank you.
Cards for Businesses With a Strong Image
A restaurant can use a photo of its dining room, and a hotel can use a photo of its lobby. Add a brief thank you and the logo. A real photo adds authenticity that illustrations cannot match.
Printing Photographs on Card Stock for the Full Photo Card
Use photo paper or a silk-coated card for the best detail. Ask the printer for a colour proof and check skin tones. A full bleed print needs 3 millimetres of bleed, so request cutting guidance.
Trim Safe Areas and Bleed
Keep important faces and text at least 5 millimetres from the edge. The photo extends to the edge, so trimming may shift the crop slightly. Ask your print shop for the recommended safe margins.
Avoiding Low Resolution Problems
Photos from social media are compressed and look soft when printed. Use original files from your camera or phone. If you must use a smaller image, reduce the print size to keep sharpness.
Sending the Photo Card by Email or Message for the Full Photo Card
Export at full size and attach the card to an email. Avoid messaging apps that compress images heavily. Include a short message in the email so that the card is a complete greeting.
Adding Handwritten Notes on the Back
The back of the card is blank for a personal note. Write a short message with a dark pen. Mention the story behind the photo to make the card more meaningful.
Respecting Privacy and Permissions
Make sure everyone in the photograph is happy to be included, especially if you post it online. Remove location data if you share on social platforms.
Colour Variations for the Text for the Full Photo Card
Switch the gold to white or a colour from the photograph for a coordinated look. Keep enough contrast for the text. Test the readability on your phone as well as on paper.
Final Check for the Full Photo Card
Check that the faces are visible, the text is readable, and the year is correct. Print a proof and view it from arm’s length.
Choosing a Photo With Negative Space for Text
Pick images with calm areas at the top and bottom, such as sky and ground. These areas give the text room to breathe. If your photo is busy, increase the gradient strength.
Using Black and White or Sepia Photographs
A monochrome photo brings elegance and hides colour inconsistencies. The gold and white text stands out on the toned background. Convert photos in your phone gallery before uploading.
Printing Large Photo Cards as Posters for the Full Photo Card
The design scales well to A3 or A2 for a family poster. Check the resolution of the photo, and ask the printer for a proof. Hang the poster in a hall or a living room.
Adding a Date or Location Caption
Place a small caption in the footer such as Lake Tahoe, July 2026. Details give the photo context for relatives and make it a better keepsake.
Creating a Square Social Version of the Photo Card
Duplicate the card and crop to a square, shifting the text. This gives you a feed-friendly image. The same photo works in two formats without extra work.
Collecting Group Photos for a Team Card
Ask each team member for a photo from the year and choose one for the cover. Place smaller pictures on the back. A shared photo card feels personal and builds team spirit across departments.