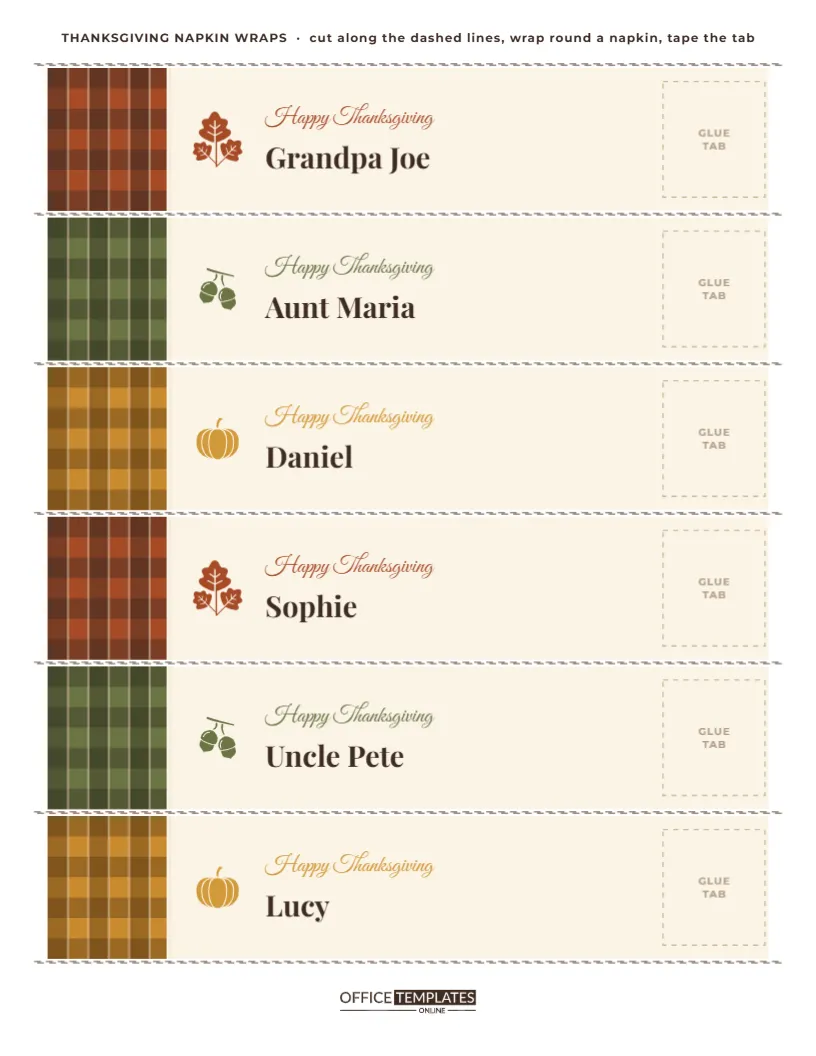
Napkin Rings are one of those touches that make a table look finished, but buying a set for twenty guests is expensive, and most of them live in a drawer for the rest of the year. Paper napkin wraps do the same job for the cost of a sheet of card. This template prints six personalised wraps on one Letter page. Each one has a strip of plaid, a small autumn icon, Happy Thanksgiving in script, and a guest’s name, so it doubles as a place card.
What Is on the Sheet
The page is US Letter, 8.5 x 11 inches, portrait. A small line of instructions runs along the top. Below it are six horizontal strips stacked one above the other, each about 7.5 inches long and 1.5 inches tall, separated by dashed cut lines.
Every strip has the same structure:
- a plaid band at the left end, about 1.2 inches long, in one of three colourways (rust and brown, olive and dark green, or mustard and chocolate), repeated down the sheet;
- a small icon in a matching colour: a leaf cluster, a pair of acorns or a pumpkin;
- Happy Thanksgiving in Great Vibes script in the same accent colour;
- the guest’s name in bold dark brown Playfair Display;
- a dashed rectangle at the right end marked GLUE TAB, where the strip overlaps itself.
The sample names are Grandpa Joe, Aunt Maria, Daniel, Sophie, Uncle Pete and Lucy. The brand mark sits at the bottom of the page.
Step-by-Step: From Sheet to Napkin
1. Type the names
Click each name and type your guests. Each strip is independent, so the six names on one sheet can be anyone. For more than six guests, change the names and download a second sheet, and so on.
2. Download and print
Download the PDF and print at actual size. Use matte card stock around 65 to 80 lb cover: stiff enough to hold its shape, flexible enough to curl around a napkin without cracking. Copy paper works in a pinch but creases easily.
3. Cut the strips
Cut along the dashed lines between strips. A paper trimmer makes this fast and straight; a ruler and craft knife on a cutting mat work well too. Trim the short ends as well, just outside the plaid and the glue tab.
4. Fold the napkin
Fold or roll each cloth or paper napkin. A simple roll or a rectangle folded in thirds lengthwise both show off the wrap well.
5. Wrap and fix
Wrap the strip around the middle of the napkin with the name on the front. Overlap the plaid end onto the GLUE TAB area at the back and fix it with double-sided tape, a glue dot, or a small piece of clear tape. The plaid will sit visibly at the edge of the back, which looks like a deliberate fabric band.
6. Add a finishing touch
Tuck a sprig of rosemary, a cinnamon stick, a small dried leaf, or a stem of wheat under the wrap before you close it.
Fitting Different Napkin Sizes
| Napkin type | How it fits | Adjustment |
|---|---|---|
| Standard dinner napkin, rolled | Wraps once with overlap | None needed |
| Cloth napkin folded in thirds | Wraps once, overlap on the glue tab | None needed |
| Thick linen napkin | Overlap is smaller | Tape just past the plaid instead of on the tab |
| Paper cocktail napkin bundle | Wrap is too long | Trim the plain middle before taping |
| Cutlery bundle in a napkin | Fits with room to spare | Wrap lower on the bundle |
Customizing the Wraps
The plaid bands are grouped shapes; select one to recolour its stripes, for example, to match your tablecloth. The icons are editable vectors tinted to the accent colour; change their colour from the swatch or swap them for other icons in the Elements panel. The Happy Thanksgiving line can become Friendsgiving 2026,Grateful, or a short menu note such as vegetarian plate for guests with special meals.
To use all six wraps in one colourway, copy the plaid band, icon and script from your favourite strip and paste them over the others, then delete the originals.
Other Uses for the Strips
- Wrap them around glass votive holders as candle bands (with LED candles only).
- Use them as belly bands for small gift boxes of fudge or cookies to take home.
- Wrap mason jars of cider or soup for guests.
- Tape them to the front of buffet bowls as dish labels.
Paper Choices for Napkin Wraps
The right paper makes the difference between a wrap that curls neatly and one that kinks. Light card stock around 65 lb cover is the sweet spot for most printers. Kraft-coloured card gives a rustic look, but the plaid will print darker on it. A linen-textured card looks lovely with cloth napkins. Very heavy card (100 lb and above) tends to crack along the curve, so if that is all you have, roll each strip gently around a pen before wrapping it on the napkin.
Setting Up a Napkin Wrap Station
If you are hosting a big group, turn the wraps into a small pre-dinner activity. Print the sheets, cut the strips in advance, and set them on a side table with rolled napkins, double-sided tape, and a bowl of rosemary sprigs and cinnamon sticks. As guests arrive, they find their name, wrap their own napkin, and carry it to their seat. Children love being given the job, and it gets everyone moving towards the table without the host needing to herd them.
Napkin Wrap Questions
Can I print them double-sided?
The wraps are designed to be single-sided because the back is hidden against the napkin.
Will the plaid line up if my printer shifts?
The plaid sits at the end of each strip with a margin, so small printer shifts do not cut into it. Trim close to the plaid if it looks uneven.
Can children help make them?
Absolutely. Cutting straight strips and taping them is a good job for older kids while the turkey cooks.
Six napkin wraps, one sheet of card, and a roll of tape: that is all it takes to give every place at your table a personal, finished look. Type your guests’ names and start cutting.