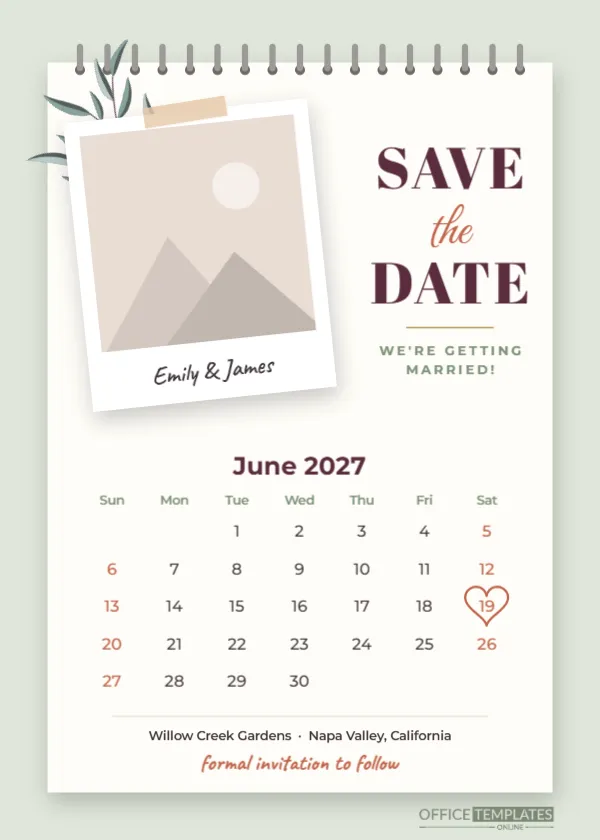
The whole point of a save the date is to highlight one special day on the calendar. Therefore, this template places your wedding date exactly where it belongs: on a beautifully designed calendar page. Inspired by a spiral-bound wall calendar, the card combines a taped engagement photo, a bold SAVE the DATE headline, and a hand-drawn heart around your wedding day.
As a result, guests can recognize the date at a glance while enjoying a thoughtful design that looks just as lovely displayed on a refrigerator as it does inside an envelope.
A Calendar Page Made for One Date
Designed in a 5 x 7-inch portrait format, this save-the-date card combines three distinctive visual elements to create a warm, personal appearance.
First, a soft sage green backdrop provides a calm, natural setting. Against this background, an ivory calendar sheet features a gentle drop shadow and silver spiral-wire loops along the top. Together, these details recreate the appearance of a traditional wall calendar.
Next, scrapbook-inspired accents bring personality to the design. A white polaroid frame sits slightly tilted to the left, secured with honey-colored washi tape. Meanwhile, a small eucalyptus sprig adds a natural finishing touch. The couple’s names, Emily & James, appear in the handwritten margin beneath their engagement photograph.
Beside the photo, the words SAVE and DATE appear in bold plum Abril Fatface lettering. A terracotta script connects the two words, while a short gold rule introduces the smaller message, WE’RE GETTING MARRIED!
Finally, the lower section displays the wedding month and year. Sage weekday headings, plum lettering, and terracotta weekend accents maintain a consistent color scheme. A hand-drawn terracotta heart circles Saturday, June 19, 2027, making the important date immediately noticeable.
Beneath the calendar, a fine dividing line introduces the venue details and the handwritten message: formal invitation to follow.
A Real Calendar You Can Change
Unlike a static calendar image, this design features an editable calendar object. Therefore, you can adjust the displayed month and year without manually rearranging every date.
To personalize your calendar, follow these simple steps:
- Select the calendar and open Calendar Options in the editor.
- Choose your wedding month and year. The calendar grid will automatically update to display the appropriate dates and weekdays.
- If desired, adjust the week settings, font, or calendar colors to complement your wedding theme.
- Next, move the separate heart shape onto your chosen wedding date. Adjust its position until the number sits neatly inside the outline.
- Finally, review the complete layout to ensure the calendar, venue information, and decorative elements remain properly aligned.
Keep in mind that some months require six rows of dates. Although the design provides additional space beneath the calendar, it is worth checking the spacing around the venue information after making changes.
What to Include on Your Save the Date
A save-the-date card gives guests advance notice of your wedding. However, it does not need to contain every detail that will eventually appear on your formal invitation.
Instead, focus on communicating the essential information clearly while keeping the overall design uncluttered.
Details Your Guests Need to Know
Begin by including both partners’ names so recipients immediately recognize whose wedding they are celebrating.
Next, display the wedding date prominently. Since this template features a full calendar, the hand-drawn heart provides a natural way to highlight the exact day without adding unnecessary text.
Additionally, include the wedding location. The city and state are generally sufficient at this stage, although you may include the venue name if it has already been confirmed.
The message Formal invitation to follow is another useful addition. It reassures guests that further information will arrive closer to the celebration.
Furthermore, if your wedding website is available, consider including its address. This gives guests an easy way to find travel information, accommodation suggestions, and other important updates.
Information You Can Share Later
While the save-the-date should communicate the main details, more specific arrangements can wait until the formal invitation.
For example, ceremony and reception times, complete venue directions, RSVP instructions, and meal preferences do not usually need to appear on the initial announcement.
Similarly, formal hosting lines, dress code information, and registry details can be communicated separately.
However, if many guests will be traveling, you may wish to include a brief accommodation note or direct them to your wedding website.
By separating essential information from later arrangements, you can maintain the card’s clean appearance while giving guests enough notice to plan.
Making the Card Your Own
Although the sample design uses a sage, plum, and terracotta color scheme, the template offers several opportunities to reflect your personal style.
- Your engagement photo: Start by replacing the sample photograph inside the polaroid frame. Choose a clear image with enough space around your faces to accommodate the frame’s proportions. As a result, your photo becomes the central personal element without disrupting the surrounding scrapbook details.
- Your names:Next, replace the handwritten caption beneath the photo with your own names. Short first names work particularly well within the polaroid margin. However, you can adjust the lettering if additional space is required.
- Your announcement: Keep the original SAVE the DATE headline or personalize the smaller supporting message. For instance, THE WEDDING OF creates a traditional introduction, while COUNTDOWN BEGINS offers a more playful alternative.
- Your decorative details: The eucalyptus illustration adds a subtle botanical accent. Nevertheless, you can adjust its color or position to better complement your chosen theme.
- Your wedding colors: Finally, consider adapting the palette to suit your celebration. Deep green and burgundy can create an elegant winter appearance. Alternatively, sand and navy offer a relaxed coastal-inspired combination.
Together, these adjustments allow you to preserve the calendar concept while creating an announcement that feels personal to your wedding.
Timing and Sending
Sending your save-the-dates early gives guests more time to arrange travel, request leave, and organize their schedules.
Generally, couples send save-the-date cards six to eight months before a local wedding. However, destination weddings and celebrations scheduled around major holidays may require nine to twelve months’ notice.
Because this design displays the entire wedding month, guests can immediately identify the relevant weekend and consider their availability.
Once your card is personalized, you can choose between printed and digital delivery.
Printed Save-the-Date Cards
For a traditional presentation, prepare your design for printing on quality 5 x 7-inch cardstock. A matte or eggshell finish can complement the soft ivory calendar sheet and natural sage background.
Additionally, A7 envelopes provide a suitable fit for the finished card. Choose an envelope color that coordinates with the design for a consistent presentation.
Before printing multiple copies, review a sample to confirm that the photograph, calendar dates, text, and decorative details appear correctly.
Digital Wedding Announcements
Alternatively, share your save-the-date electronically with friends and family.
A digital version is convenient for guests who live overseas or prefer receiving wedding updates by email or messaging apps.
Furthermore, the portrait layout makes the design suitable for viewing on mobile devices. You can also include the announcement on your wedding website to keep the information easily accessible.
Save the Date FAQs
What if our wedding date isn’t in June?
Simply select your wedding month and year in Calendar Options. Once the calendar updates, move the heart outline onto your chosen date. Afterward, review the spacing and update the venue information if necessary.
Can we use a photo without the polaroid frame?
Yes. Although the polaroid contributes to the scrapbook appearance, you can adjust the frame to achieve a different visual effect. For example, an ivory or kraft-brown border creates a softer, more understated presentation.
Additionally, removing the handwritten caption can give the photo a cleaner appearance.
Does it work for a vow renewal or an elopement party?
Yes. The calendar concept can also be adapted for other meaningful celebrations.
For a vow renewal, replace the announcement with WE’RE RENEWING OUR VOWS. Alternatively, an elopement celebration might feature WE ELOPED! LET’S CELEBRATE.
Then, update the calendar and location details to reflect your event.
Can the heart be a different shape?
Certainly. You can replace the heart with an outlined circle, star, or another simple decorative shape.
However, keep the outline thin enough to ensure the date remains easy to read. This way, your chosen day stays the focal point of the calendar.
Make Your Special Date Unforgettable
Your wedding deserves an announcement that feels personal from the very first glance. With its calendar-inspired layout, engagement photo, and thoughtful scrapbook details, this design turns an important date into a memorable keepsake.
Download your template today, add your favorite engagement photo, select your wedding month, and circle the day that marks the beginning of your next chapter together. Whether you print your cards or share them digitally, give your guests a beautiful reminder of the celebration ahead.